
Are you frustrated that your crafted email campaigns never make it to recipients inboxes?
I understand the struggle. Aggressive spam filters block a portion of junk email messages even before subscribers have a chance to see them. However the key to improving deliverability lies in maintaining an IP reputation.
By whitelisting and monitoring performance you can enhance your IPs credibility with players like Gmail, who control the email gates.
Let’s explore the world of IP Whitelisting and its impact on email marketing.
Table of Contents
What is IP Whitelisting?
IP whitelisting involves adding your IP address to approved sender lists of email providers and ISPs. Being recognized as a sender reduces the chances of your emails being flagged as spam ensuring they are delivered directly to recipients inboxes.
Importance of IP Whitelisting in Email Campaigns
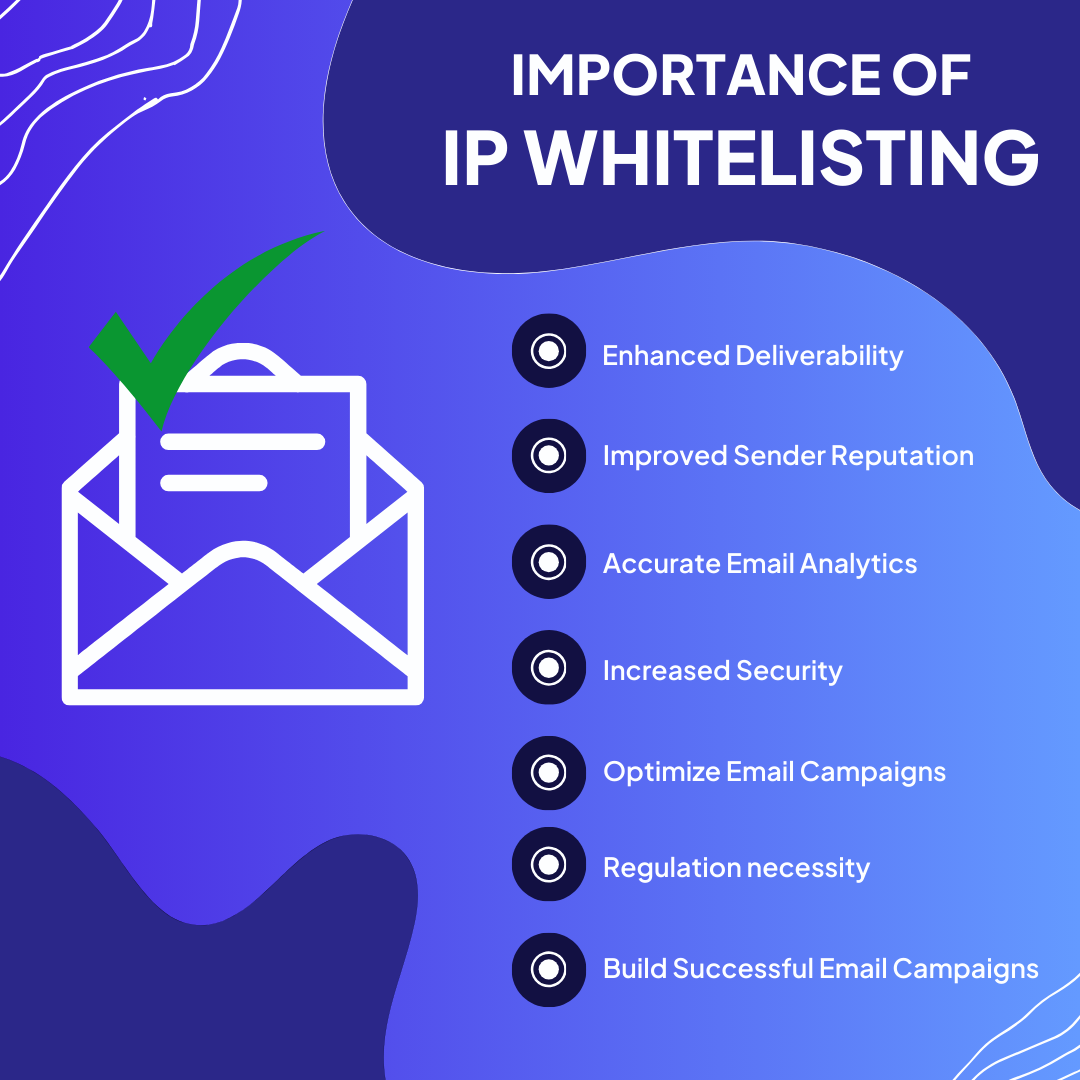
When it comes to email campaigns utilizing trusted IP addresses, whitelisting can truly make an impact. It’s not about making sure your emails end up where they should, it’s about establishing a strong foundation of trust, security and efficiency in your online communication.
Diving into IP whitelisting: your email campaigns’ secret to hitting the inbox target every time.
Enhanced Email Delivery
🎯 Ensures that emails reach the intended recipients inbox by showing Internet Service Providers (ISPs) and Email Service Providers (ESPs) that the sender’s IP address is reliable.
🎯 Reduces the chances of emails being flagged as spam or blocked.
Improved Sender Reputation
🎯 Develops a rapport with ISPs over time increasing the chances of future emails being delivered successfully.
🎯 A respected sender IP may lead to treatment in email handling by certain ESPs.
Accurate Email Performance Metrics
🎯 Ensures the health and hygiene of your email lists by regularly cleaning and segmenting, leading to improved overall campaign performance.
🎯 Enables targeted and personalized email campaigns by categorizing subscribers based on their preferences, behaviors, and engagement levels, thus increasing relevance and effectiveness.
Enhanced Security Measures
🎯 Safeguards your domain from being impersonated. Lowers the likelihood of emails being viewed as security risks.
🎯 Strengthens recipients confidence in your messaging preserving your brand reputation.
Optimized Email Campaign Results
🎯 Secures the effectiveness of email marketing initiatives by impacting key performance metrics.
🎯 Results in heightened engagement levels and impactful communication with target groups.
Essential for Regulatory Adherence
🎯 Critical for sectors governed by privacy and data protection laws (e.g., GDPR, HIPAA).
🎯 Aids, in maintaining compliant email operations.
Foundation for Email Campaigns
🎯 It’s not just a recommended practice but a crucial component that underpins all other aspects of an email campaign.
🎯 An indispensable factor for businesses striving to create successful email marketing strategies.
| Fun Fact: According to WordToTheWise data cold emails often struggle to reach recipients when sent from an IP address with no established sending history reaching only around 13% of people. However if those same emails are sent from an IP address that has been approved by major email services like Gmail and Outlook they have a delivery success rate of over 62%. |
Difference between Whitelisting and Blacklisting
Keen to understand the contrast between whitelisting and blacklisting? Let’s explore it
| Parameter | Whitelisting | Blacklisting |
| Definition | Adds approved senders to ensure email delivery. | Blocks senders to prevent email delivery. |
| Purpose | Ensures email is not spammed. | Prevents spam/phishing delivery. |
| Usage | Ensures important emails are not marked as spam. | Blocks spam or phishing. |
| Scope | Individual or server level. | Individual or server level. |
| Effectiveness | Ensures email delivery to the inbox. | Blocks unwanted emails. |
| Implementation | Adds senders to approved list. | Adds senders to blocked list. |
| Automation | Can automate through settings. | Can automate through settings. |
| Risk | Spam risk if not managed. | May block legitimate emails. |
| Management | Requires ongoing management. | Requires ongoing management. |
| User Experience | Improves by ensuring delivery. | Improves by blocking unwanted emails. |
| Flexibility | Add specific addresses. | Add specific addresses. |
| Customization | Customize allowed senders. | Customize blocked senders. |
| Visibility | Visible to the recipient. | Typically not visible to the recipient. |
| Reputation Impact | Improves sender reputation. | Can damage sender reputation. |
| Maintenance | Manage approved list. | Manage blocked lists. |
| Response to Changes | May require manual updates. | May require manual updates. |
| Email Deliverability | May require manual updates. | Improves by blocking unwanted emails. |
| Email Engagement | Improves deliverability. | Improves by blocking unwanted emails. |
| Legal Implications | Improves engagement. | Consent issues if automated. |
How to Whitelist Your IP Address?
Wondering how to authorize an IP address? Authorizing an IP address grants it some network access privileges or exempts it from certain restrictions within a network, system or application.
Let’s walk upon the following steps.
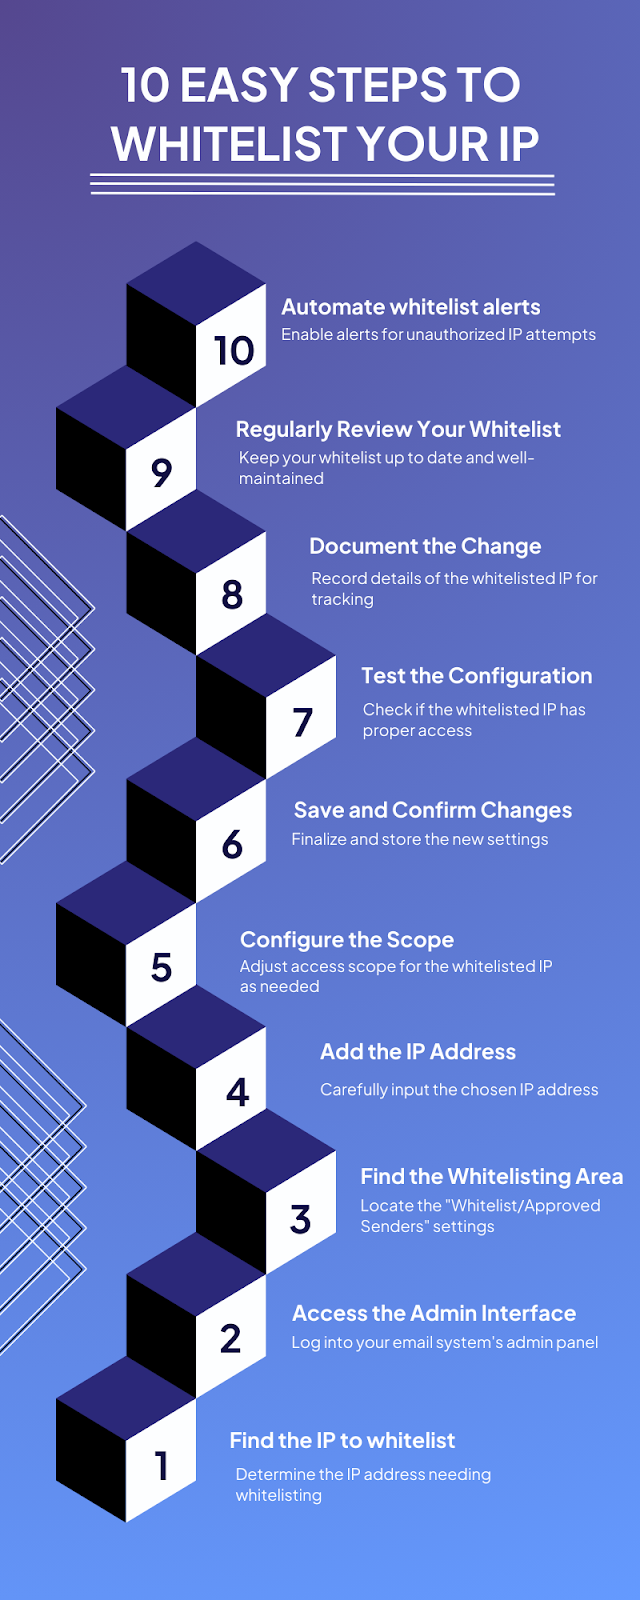
Step 1 : Identify IP Address – Choose the IP needing access.
Step 2 : Access Admin Interface – Log into the control panel.
Step 3 : Find Authorization Section – Search for “Spam Filters” or “Whitelist.”
Step 4 : Add IP Address – Enter the chosen IP accurately.
Step 5 : Adjust Scope (Optional) – Customize access scope if needed.
Step 6 : Save Changes – Confirm and apply changes.
Step 7 : Test Configuration – Check access from the whitelisted IP.
Step 8 : Document Changes – Log all whitelisted IPs and reasons.
Step 9 : Review Whitelist – Update your whitelist regularly.
Step 10 : Automate Alerts – Set alerts for unauthorized access attempts.
Step-By-Step Guide to Whitelist Your Email in Gmail
In Desktop
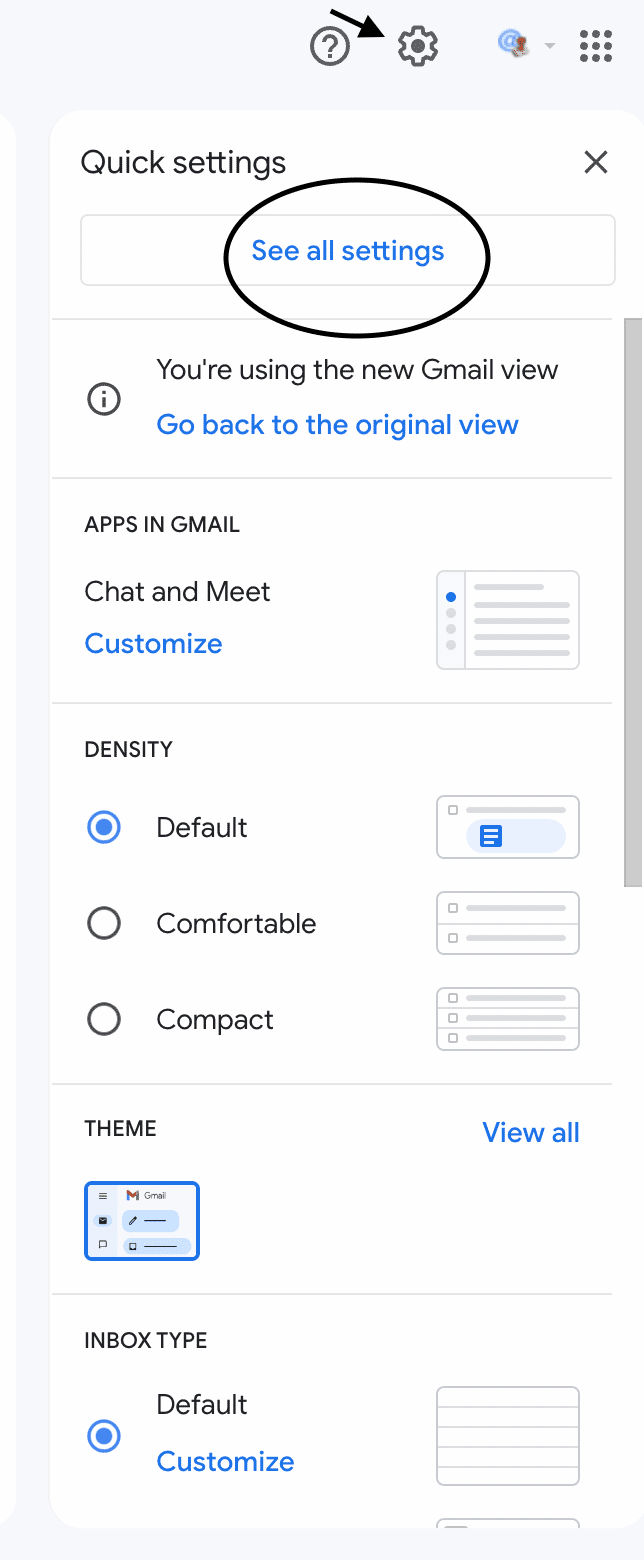
Next click on the gear icon located at the right corner and select “See all settings” to access the settings menu.
- To access your Gmail account start by opening gmail.com and log in.
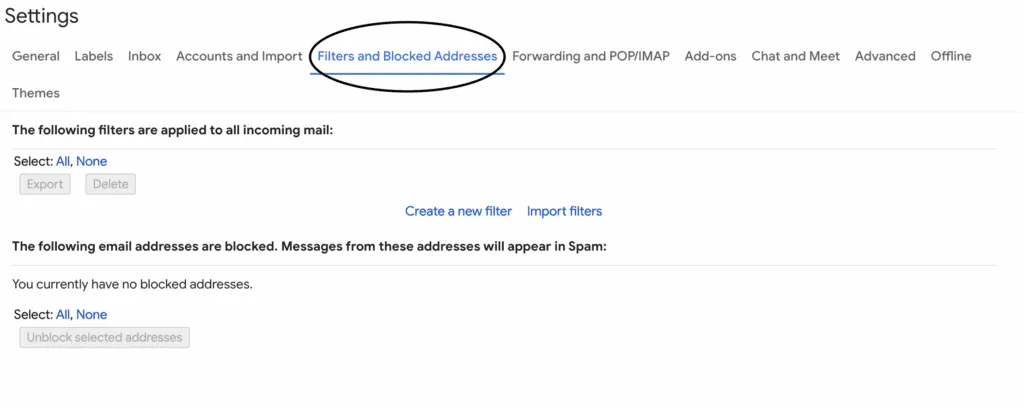
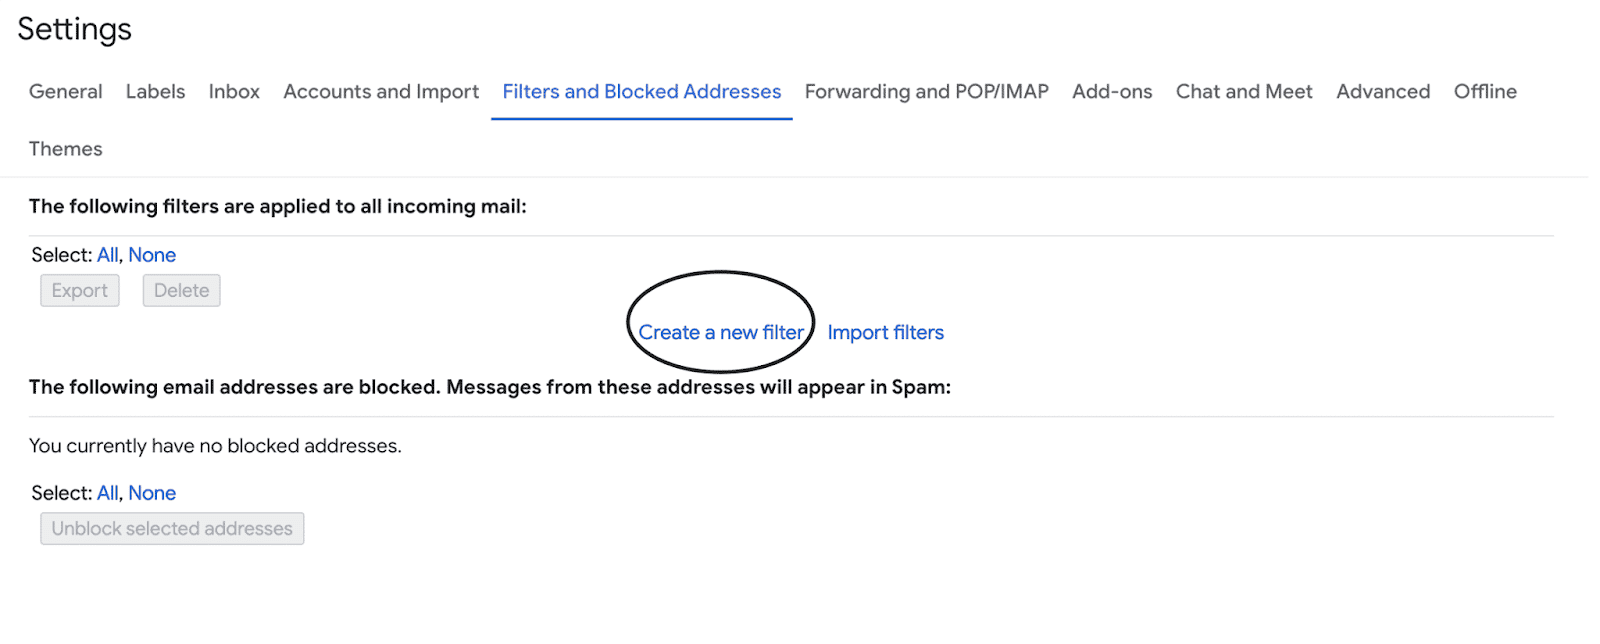
- Navigate to the “Filters and Blocked Addresses” tab to create a filter by clicking on “Create a new filter” at the bottom of the page.
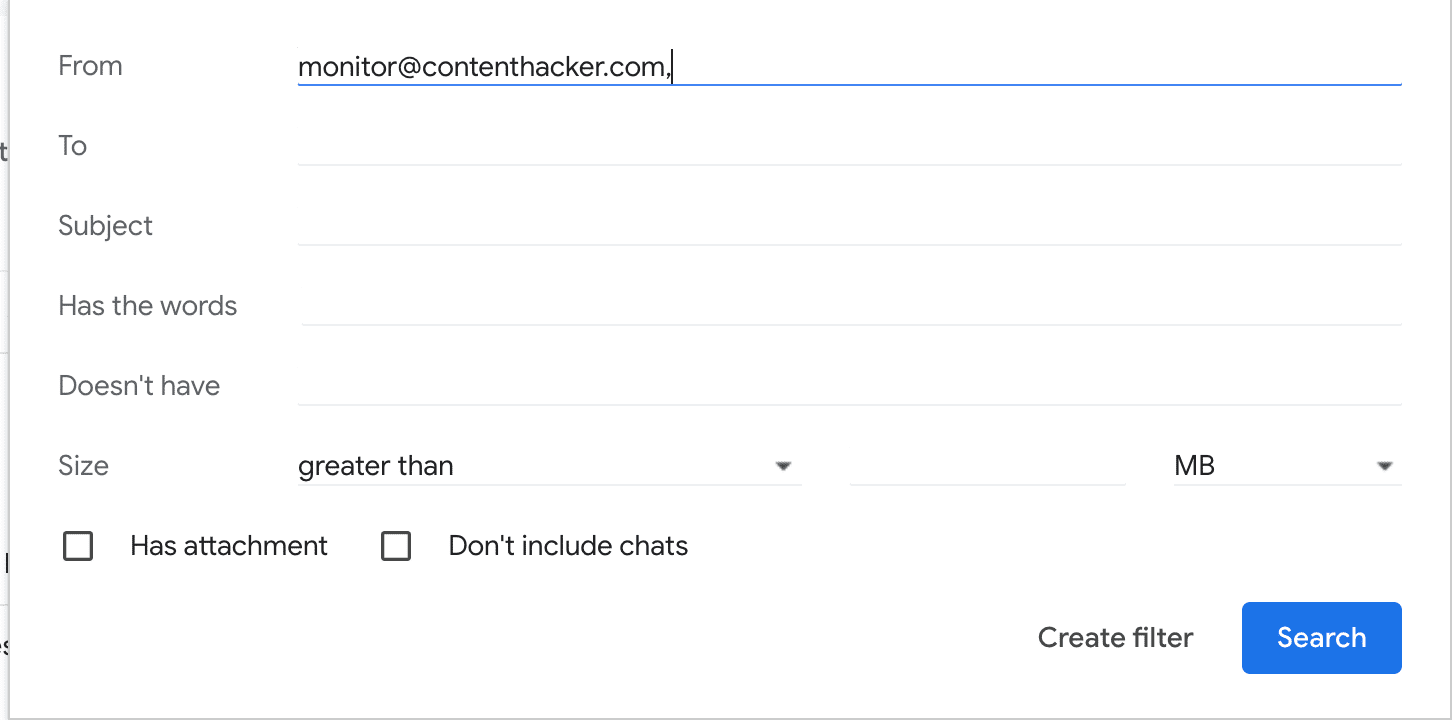
- In the “From” field enter the email address or domain (e.g., @example.com) that you wish to whitelist.
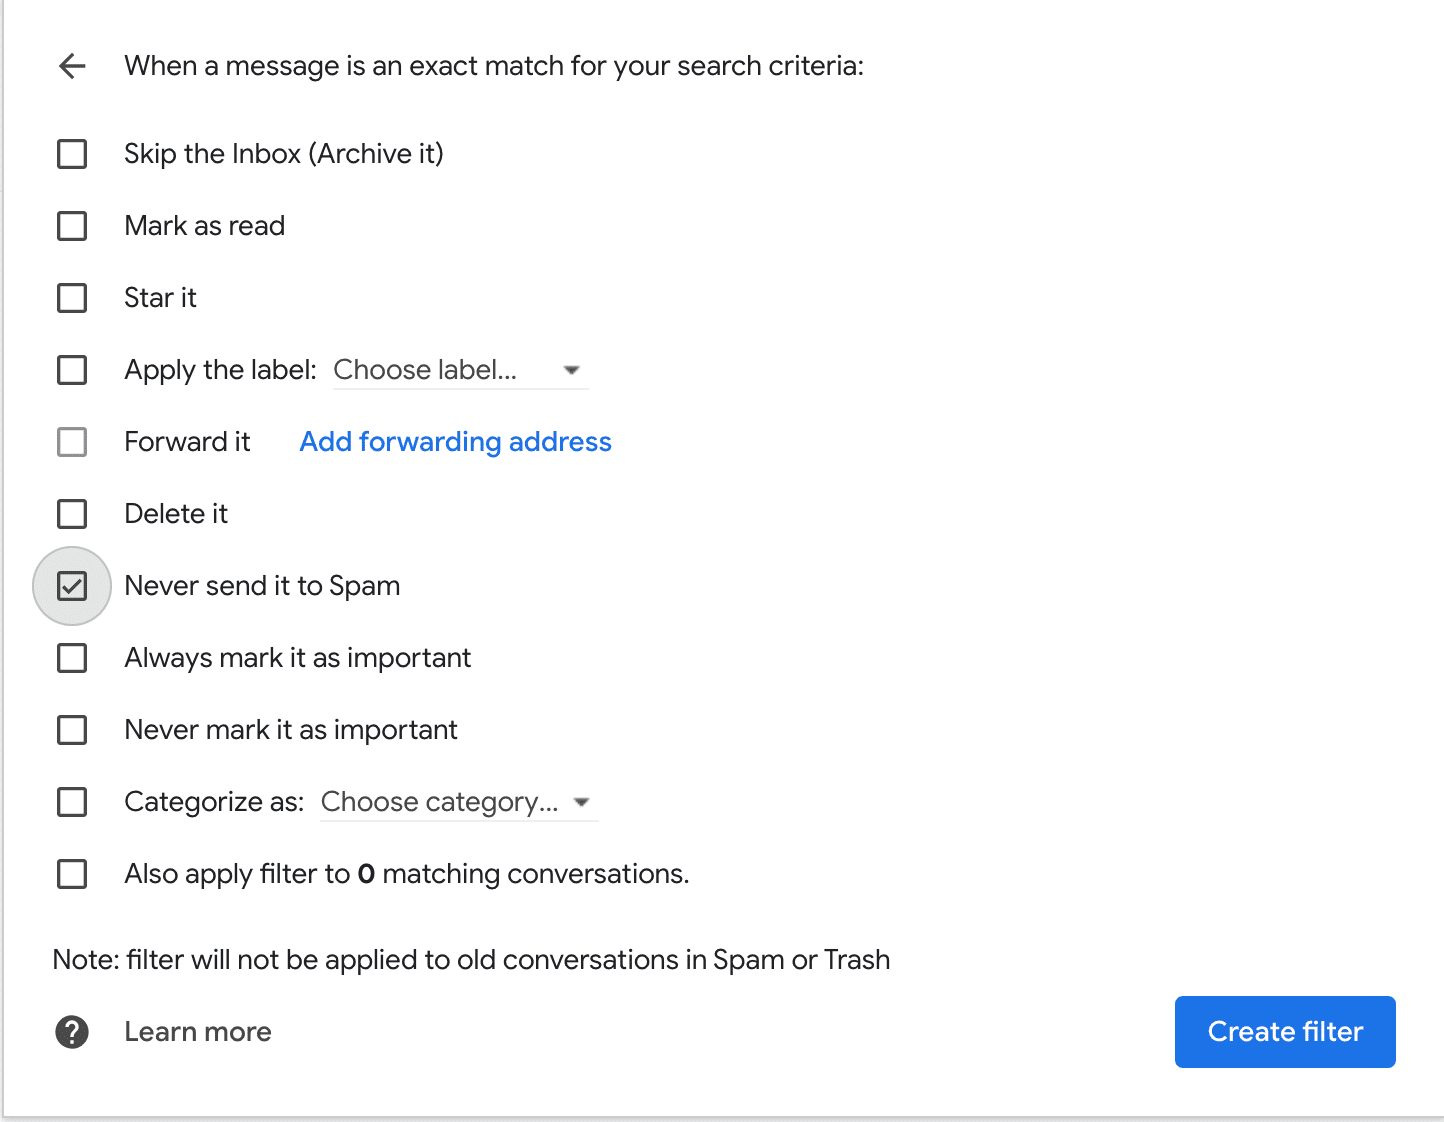
- After adding the address click on “Create filter with this search” and ensure to check the option “Never send it to Spam”.
- Save your filter by clicking on “Create filter”.
- To test if it works, ask the sender to send a test email and confirm that it appears in your inbox.


Image Source: contenthacker.com
In Mobile App
Follow the below steps to add an email address to the whitelist in the Gmail mobile app.
- Find the email – look for an email from the sender you want to allow.
- Mark important – click on the three dots located in the top right corner of the email. Choose “Mark as important.”
- Add to contacts – click on the sender’s name at the top of the email. Select “Add to contacts” or “Create contact.” Save their contact details.
- Move from Spam (if needed) – if the email is in your Spam folder open it click on the three dots and select “Not spam.”
- Test – have the sender send another email to make sure it goes directly to your inbox.
For further clarifications visit https://postmaster.google.com/
Step-By-Step Guide to Whitelist Your Email in Outlook
In Desktop
Here is a simple step by step guide for allowing emails from an address in Outlook on your computer.
- Launch Outlook – open the Outlook program on your computer.

- Access Settings – click on “File” at the left corner and then choose “Options.”

- Navigate to Junk Email – in the Options menu Junk Email” from the left sidebar.
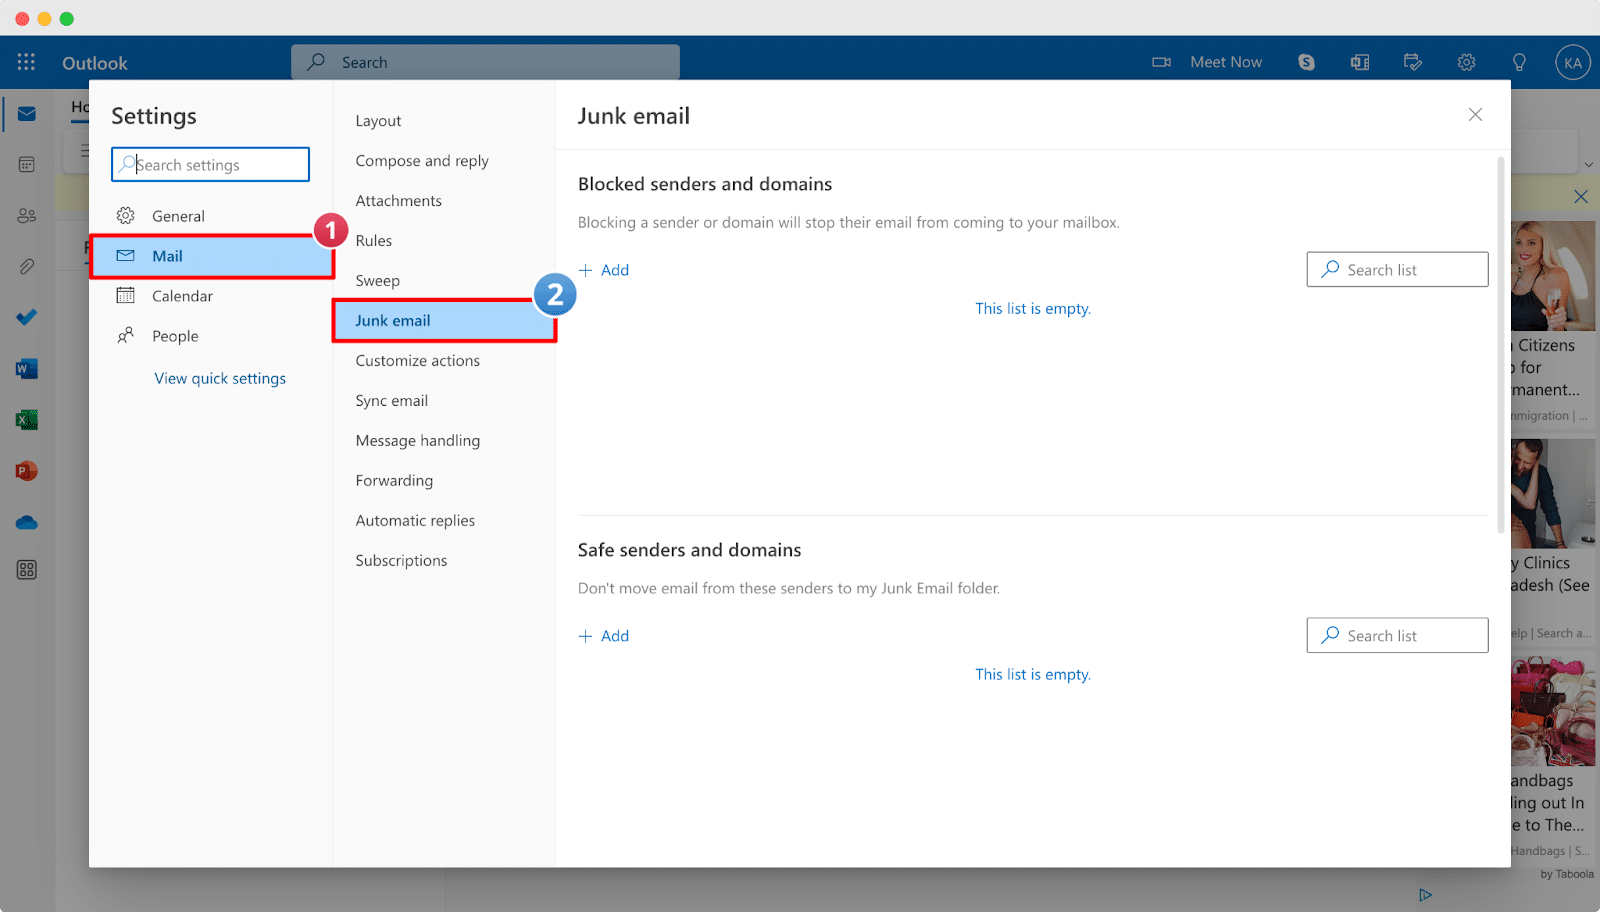
- Manage Safe Senders – go to the “Safe Senders” tab, under Junk Email settings.
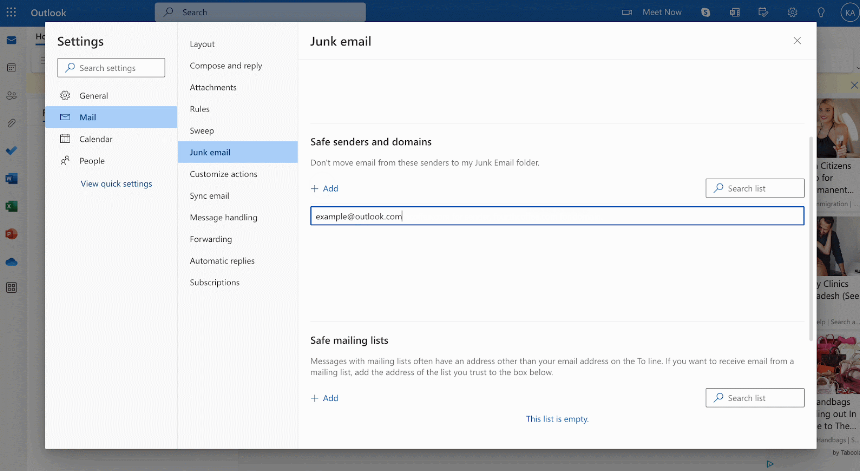
- Add Email or Domain – click on “Add” and input the email address or domain you wish to whitelist.
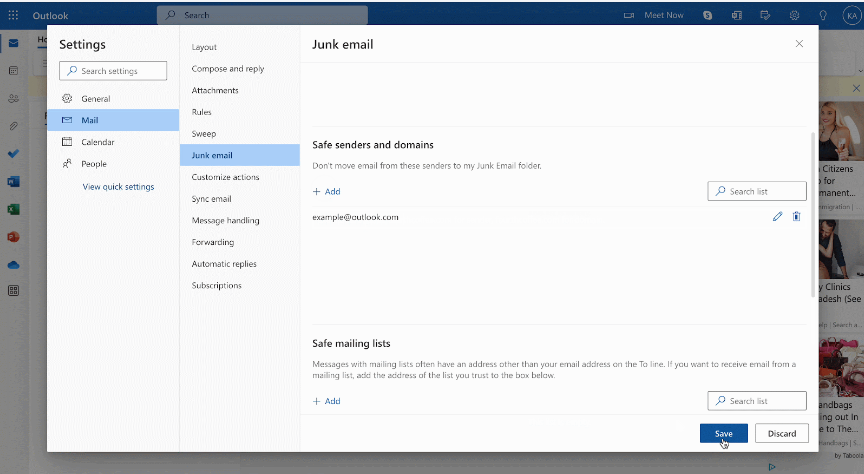
- Save Changes – hit “OK” to save your modifications and close the Junk Email Options.
- Close Outlook Options – click “OK” to exit the Outlook Options menu.
- Restart Outlook (Optional) – close and reopen Outlook for the changes to take effect.
Image Source: notificationx.com
In Mobile App
- Launch Outlook App – open the Outlook app on your device.
- Locate Email – find an email from the sender you want to whitelist.
- Open Email – click on the email to view its contents.
- Adding Sender to Contacts:
- Click on the sender’s name at the top of the email.
- Choose “Add to Contacts” or a similar option.
- Provide any details if necessary and save the contact.
- Not Junk (If Email is in Junk Folder)
- If the email is in your Junk folder, open it.
- Click on the menu icon with three dots or “More” options.
- Select “Move to Inbox” or “Mark, as not junk.”
By saving the senders contact information and marking their emails as not junk you assist Outlook in identifying their messages as important ensuring they reach your inbox reliably in future.
For further clarifications visit https://sender.office.com/
Step-By-Step Guide to Whitelist Your Email in Yahoo
In Desktop
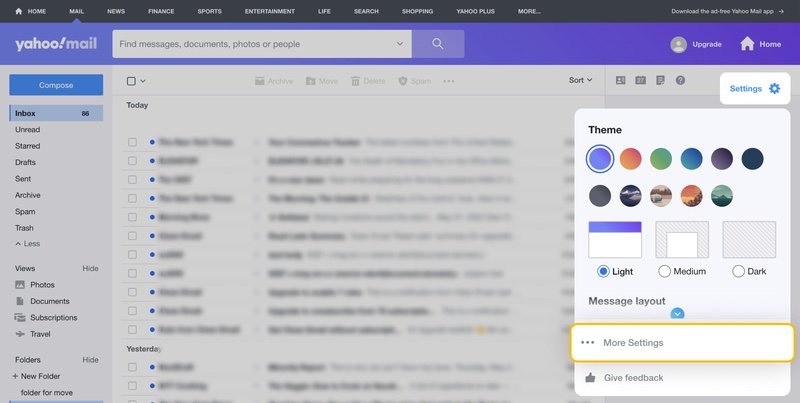
- Sign in to Yahoo Mail – Open your web browser, access Yahoo Mail and log in.
- Access Settings – Click on the gear icon located in the right corner then choose “More Settings” from the dropdown menu.
- Navigate to Filters – on the sidebar click on “Filters.”
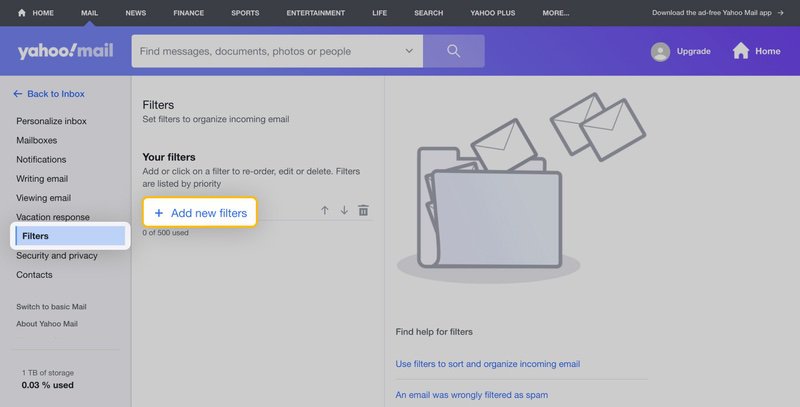
- Create a New Filter – Click on the button that says “Add filter.”
- Name Your Filter – Give your filter a name (e.g., “Whitelist”).
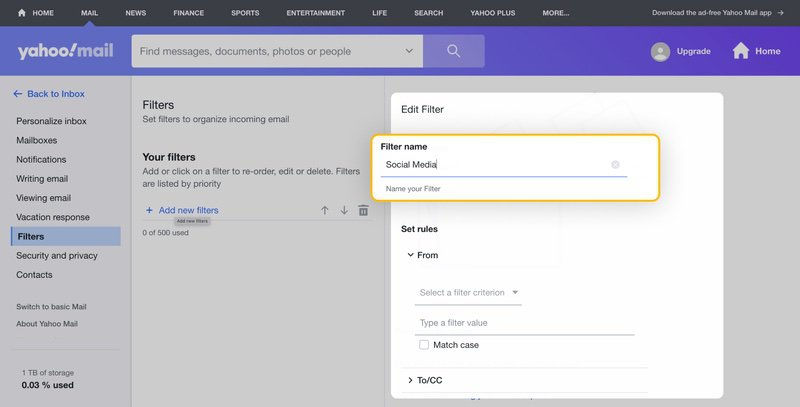
- Define Filter Criteria
- In the “From” field input the email address you wish to whitelist.
- You can also utilize the “contains” option for specifying a portion of the email address or domain name.
- Select Destination Folder – Choose “Inbox” as the destination folder to ensure that emails from this sender are always directed to your inbox.
- Save Your Filter – Click on “Save” to activate your filter.
After completing these steps emails, from the whitelisted address will be automatically routed to your inbox without being filtered as spam.
Source: clean.email
In Mobile App
Make sure you never miss emails, in the Yahoo Mail app by marking them as not spam and adding the senders to your contacts. Just follow these steps.
Open the Yahoo Mail app on your phone.
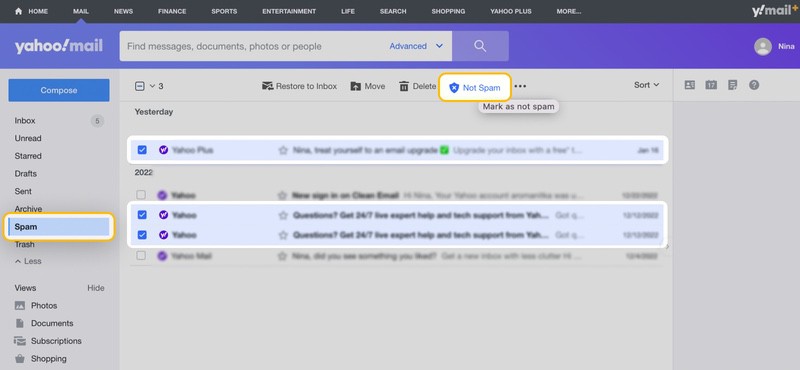
- First check the Spam folder for any emails from the sender.
- To mark it as Not Spam open the email and click on the “More” option (three dots).
- Choose “Not Spam” to move it to your inbox.
- Add the sender to contacts by locating the email in your inbox and click on the sender’s email address, at the top.
- Select “Add to contacts” enter their details and finally save it.
- Verify the process by asking the sender to email you again and ensure it goes directly to your inbox.
For further clarifications visit https://help.yahoo.com/kb/SLN25925.html
Step-By-Step Guide to Whitelist Your Email in AOL Mail
In Desktop:
- To log in, open your web browser, visit the AOL Mail login page and sign in with your credentials.
- Next navigate to the “Options” section located at the right corner and choose “Mail Settings.”
- Within the settings menu access the “Spam Settings” tab.
- If you want to whitelist email addresses or domains go to the “Sender Filter” section and select the option to allow mail only from specific addresses.
- You can also manually add email addresses or domains by entering them into the provided box.
- After entering the desired information click on the “button to include it in your safe senders list.
- Don’t forget to save your changes by clicking on the “Save Settings” button at the bottom of the page.
- Double check that your whitelisted email address or domain has been successfully added for inbox delivery, in AOL Mail.
In Mobile App:
- Open the AOL Mail App by clicking on the app icon on your device.
- Access your Contacts by selecting the contacts or address book feature within the app.
- Add a New Contact by looking for an option like a sign or “Add Contact.”
- Enter the Senders Information, including their email address and any other relevant details.
- Save the Contact by confirming or saving the contact entry.
- Keep an eye on your inbox for emails from the whitelisted sender to ensure they’re not mistakenly marked as spam.
This method indirectly whitelists an email address by letting AOL Mail know that emails from this contact are important to you and should be delivered to your inbox.
For further clarifications visit https://postmaster.aol.com/
Step-By-Step Guide to Whitelist Your Email in Apple Mail
In Desktop
To whitelist an email in Apple Mail on your computer, you need to add the sender to your contacts so that Apple Mail recognizes them as a trusted source. Here’s a simple guide to help you through it:
- Open Apple Mail – Start by launching the Mail app on your Mac.
- Select an Email – Choose an email from the sender you want to whitelist.
- Add to Contacts
- Right click on the sender’s name at the top of the email.
- Select “Add to Contacts” from the options that appear.
- Fill in Details – In the Contacts app provide any information about the sender if needed.
- Save – Click on “Save” to include the sender in your contacts.
Following these steps will ensure that emails from this whitelisted sender are identified by Apple Mail as trustworthy, reducing the likelihood of them being mistakenly marked as spam.
In Mobile App
To whitelist a sender in Apple Mail on your iOS device follow these steps:
- Open the Mail app.
- Open an email from the sender you want to whitelist.
- Tap on the sender’s name or email address at the top of the email.
- Choose either “Create New Contact” or “Add to Contact.”
- Enter the contact details and tap “Done” to save the sender to your contacts.
- If necessary adjust Junk Mail Filtering by going to Settings > Mail selecting “Blocked”, under “Threading ” and adding the sender to ensure their emails are not blocked.
- By saving the sender as a contact you’ll whitelist them in Apple Mail allowing their future emails to show up in your inbox seamlessly.
10 Best Practices of IP Whitelisting
Check out these 10 suggestions for IP whitelisting in email campaigns straight from the experienced sales professionals at Sparkle!
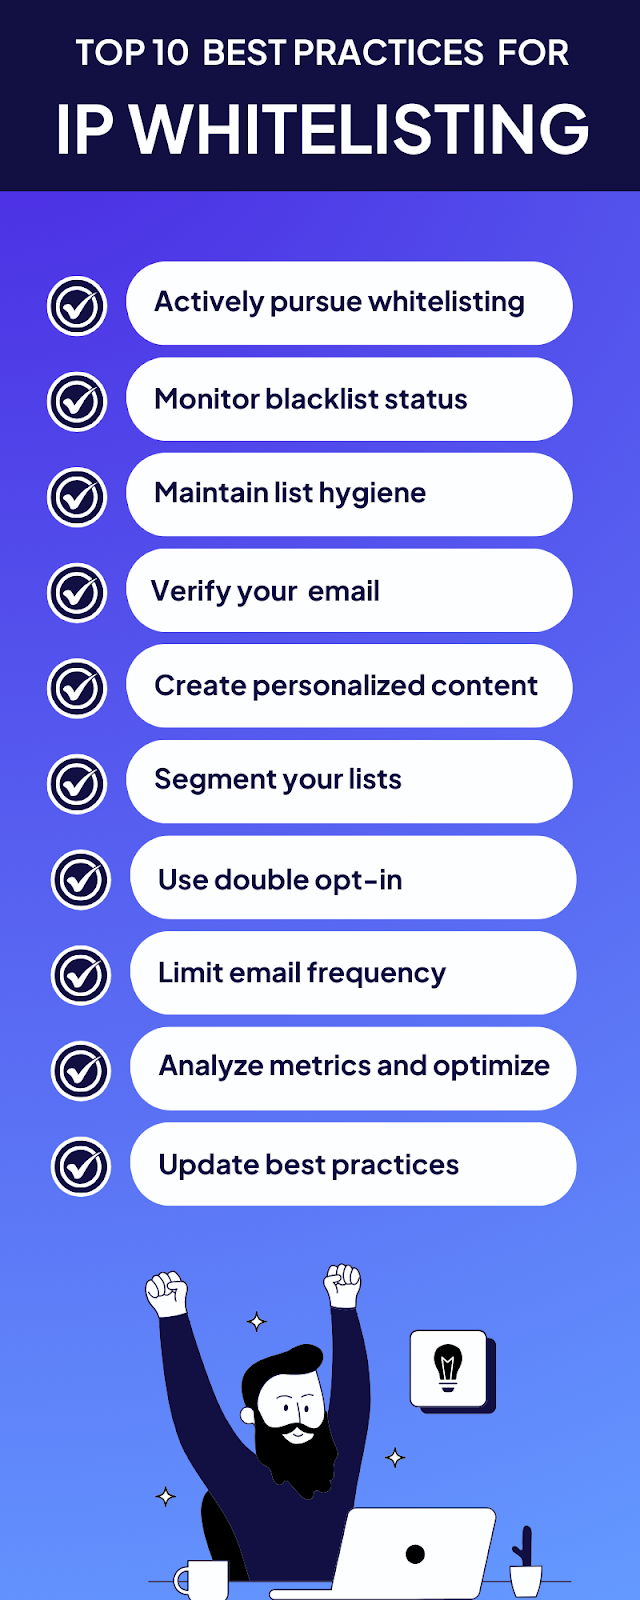
✅ Actively Seek Whitelisting
Submit your IP addresses and domains to leading email service providers (ESPs) such as Gmail, Outlook, Yahoo, etc. To actively seek whitelisting. This helps ensure that your emails avoid spam filters and land in recipients inboxes.
✅ Monitor Blacklist Status
Make sure to monitor popular blacklist services to promptly identify if your IP addresses are flagged. If you find yourself on the list, swiftly determine the reason. Take steps to remove your listing by fixing the root problem. Being proactive in monitoring and addressing issues promptly is crucial, for ensuring that your emails reach their intended recipients.
✅ Maintain List Cleanliness
Remove subscriber emails promptly, respect unsubscribe requests and obtain explicit opt-in consent. Keep your email lists tidy to prevent complaints about emails.
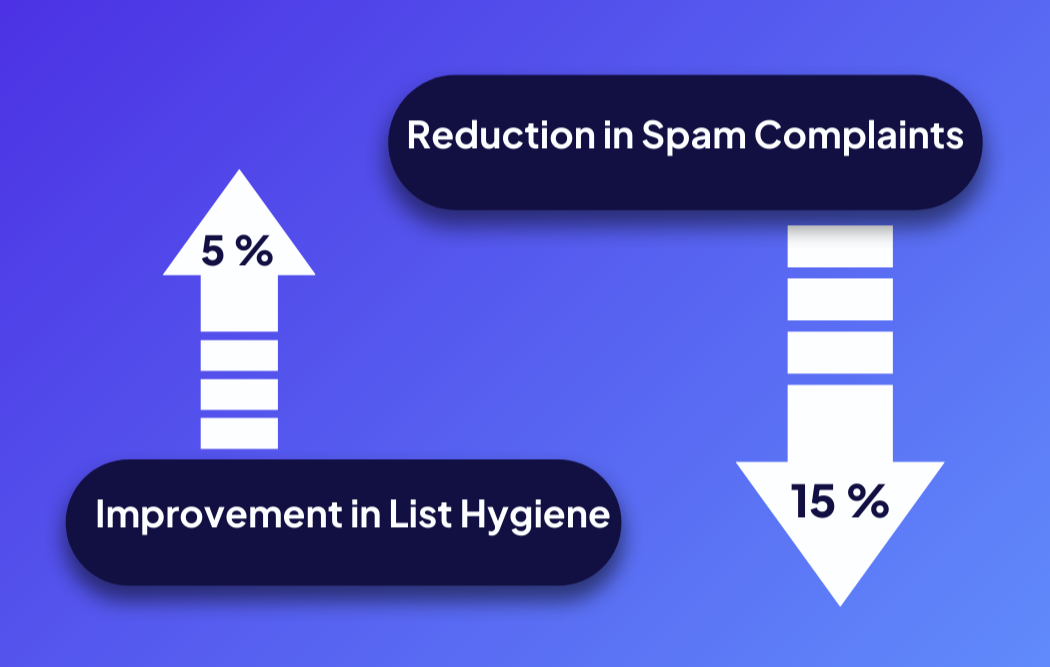
An improvement of just 5% in list hygiene can lead to a reduction of over 15% in spam complaints.
Regularly purging inactive subscribers, removing non-responsive emails, and honoring unsubscribe requests are crucial practices that lead to a healthier subscriber base and better IP standing.
✅ Implement Email Verification
Make sure you have SPF, DKIM and DMARC records set up for your domain to confirm the authenticity of your emails. These settings help validate your identity as the sender enhancing the whitelisting procedures and increasing email delivery rates. It’s essential to incorporate these steps to build credibility, with email services and those receiving your emails.
✅ Create Tailored Personalized Content
Create customized email content that connects with subscribers, on a personal level increasing their satisfaction and engagement. Tailoring messages can improve interaction rates. Enhance the effectiveness of your email approach.
✅ Organize Your Contact Lists
Customize your email campaigns by dividing your contact lists into segments based on preferences, interests, behaviors, demographics and more. Make sure to send each group content that resonates with them.
✅ Implement Double Opt in Process
Implement an opt in system where subscribers need to confirm their email subscription by clicking on a verification link sent via email. This method helps reduce spam and lowers the chances of receiving abuse complaints leading to an organized list of subscribers.
✅ Control Email Frequency
Adjust the frequency of emails based on subscriber preferences and engagement levels to prevent overwhelming them. By spacing out emails we can show respect for user boundaries and encourage more active engagement.
✅ Monitor Metrics and Enhance Performance
Make it a habit to consistently assess and scrutinize the data gathered from your email campaigns to pinpoint areas, for enhancement. Utilize the knowledge acquired to fine tune and enhance your email marketing tactics for improved results.
✅ Stay Informed About Industry Standards
Make sure to refer to recommendations provided by Email Service Providers and industry professionals regarding the effective whitelisting practices. Adjust your approaches as needed to align with the changing industry norms.
FAQs
👉 What are the benefits of IP whitelisting?
IP whitelisting in emails significantly decreases the chances of phishing attacks and spam by permitting emails from trusted sources thereby enhancing security and ensuring that important messages receive priority attention amidst a sea of unwanted communications.
👉 Can you provide an example of whitelisting in practice?
A company has established an email filter that permits messages from specific domains or email addresses to reach employees inboxes blocking all other emails as potential spam.
👉 What does it mean to whitelist an email address?
Whitelisting an email address involves adding it to a list of approved email senders within an email system. When an address is on the whitelist any emails originating from that address will be. Delivered to the recipient’s inbox.
👉 Is it possible for IP whitelisting to be hacked?
Indeed IP whitelisting can be vulnerable to hacking like other security measures. Hackers might attempt to manipulate whitelisted IPs known malicious code or exploit weaknesses in the implementation process in order to bypass whitelist restrictions and attack sites.
Time To Level Up
- Focus on securing whitelisting status with email providers.
- Adhere to sender practices such as maintaining clean lists and respecting opt out requests.
- Deliver personalized content for subscribers rather than focusing solely on sales pitches.
- Regularly analyze email metrics and fine tune your campaigns.
- By managing IPs and adopting subscriber centric marketing strategies you can boost deliverability rates, open rates and conversions.
- Follow established practices for whitelist emails, to maintain lasting whitelist status and ensure your emails land in recipients inboxes.
Stick to using IP whitelisting and master your email strategy. Your success story in managing your inbox is right, within reach!