
Have you ever been annoyed that you spent time and effort crafting a crucial email just to have it end up in the spam folder?
Don’t worry, there is a workaround available: DKIM implementation.
Let’s get started and make sure your emails reach their appropriate inbox safely.
Table of Contents
What is DKIM?
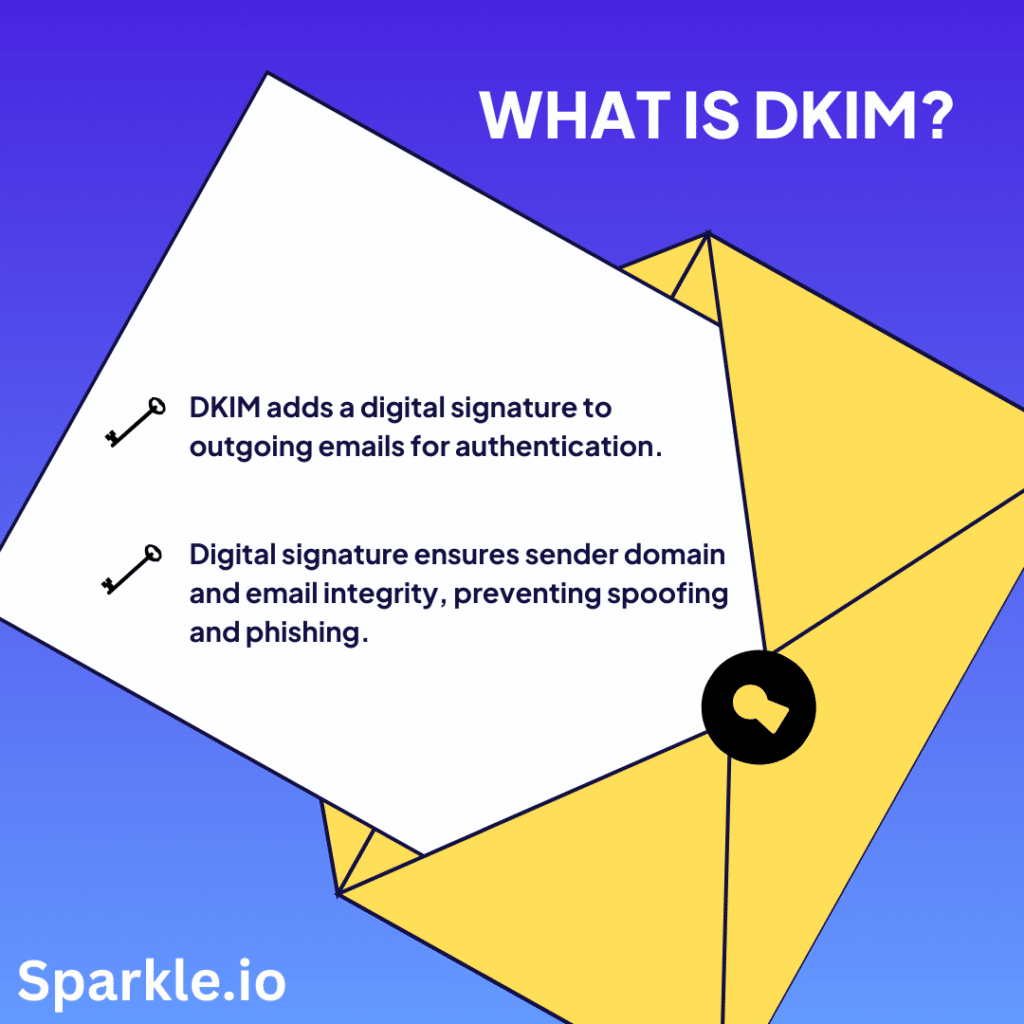
DKIM (DomainKeys Identified Mail) is an email authentication technique that uses digital signatures linked to the sender’s domain to verify the sender’s identity and ensure message integrity. It helps prevent email spoofing and phishing by confirming that emails are genuine and unaltered, thereby improving email security and reducing spam.
Importance of DKIM : The Need to Know
Let’s delve into how DKIM enhances our email security measures from safeguarding message authenticity to boosting our defenses against emerging cyber threats.
The essential role of DKIM in enhancing the security and reliability of digital communications is about to be revealed.
Enhancing Email Integrity
- Adds a signature to emails to validate the senders domain legitimacy and content integrity.
- Safeguards against email spoofing and other phishing attacks by verifying message authenticity.
Building Trust in Digital Communication
- Demonstrates an organization’s dedication to security fostering trust among clients and partners.
- Crucial for sectors where sensitive data exchanges are common.
Reducing Spam and Improving Deliverability
- Emails signed with DKIM are less likely to be flagged as spam, increasing the chances of reaching the intended recipient’s inbox.
- Ensures important messages are not missed or misplaced in spam folders.
Future-Proofing Email Security
- Serves as an element for current and future email security strategies.
- Forms part of a security framework alongside SPF and DMARC addressing evolving cyber risks.
| Note : According to DMARC the number of 1,024 bit keys roughly doubled, while the number of 2,048 bit keys increased by 4.5 times. |
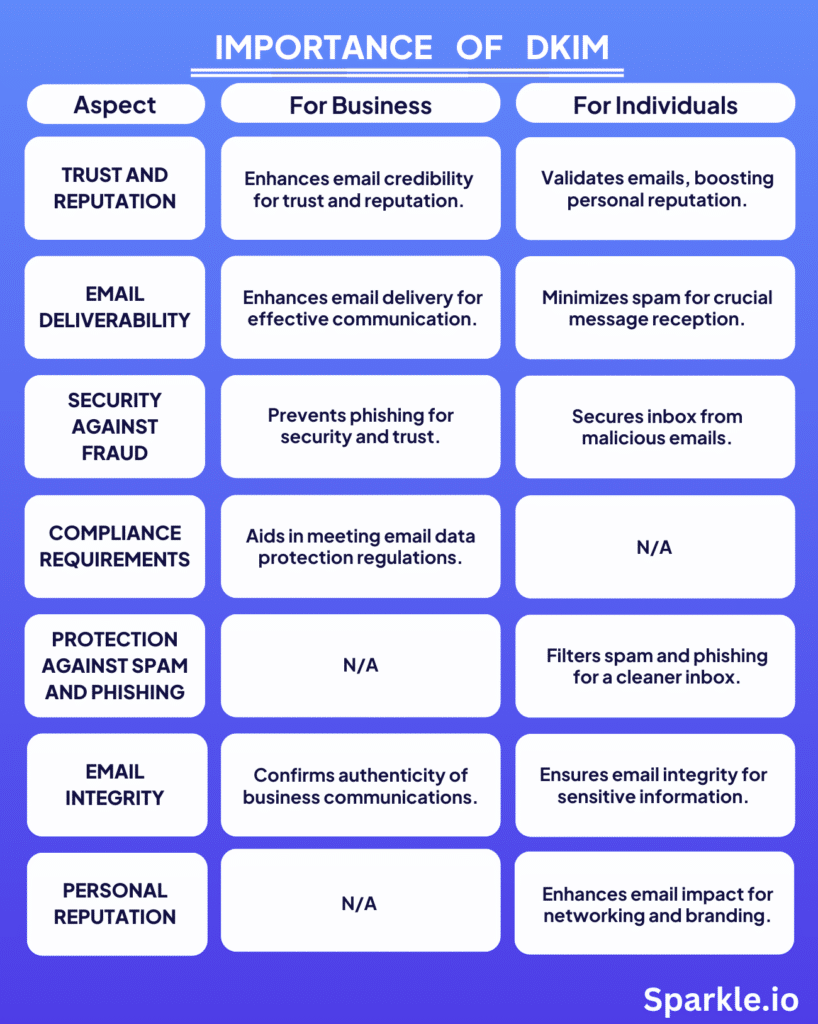
Let’s take a quick look at the table below, which highlights how DKIM plays a crucial role in ensuring email security and trust, both for businesses and individuals.
The Essential Steps for Setting Up DKIM
| Step | Where to Do (Platform) | What to Do |
| 1. Verify domain ownership | Google Workspace (G Suite), Microsoft Outlook 365 | Follow the domain verification process outlined in the admin console |
| 2. Generate DKIM selector and record value | Google Workspace (G Suite), Microsoft Outlook 365 | Access the DKIM settings in the admin console to generate the DKIM selector and record value |
| 3. Log into DNS hosting provider account | GoDaddy, Cloudflare | Log in to your GoDaddy or Cloudflare account where your domain’s DNS records are hosted |
| 4. Add a new TXT record | GoDaddy, Cloudflare | Navigate to the DNS settings and add a new TXT record with the DKIM information provided |
| 5. Configure DKIM signing | Google Workspace (G Suite), Microsoft Outlook 365 | Enable DKIM signing in the admin console to activate DKIM authentication |
| 6. Verify DKIM record setup | Online DKIM check tools | Use online tools to verify if the DKIM record is correctly published and configured |
In this blog, we’ve given a step-by-step guide on how to set up DKIM.
👉 Setting up DKIM in Google Workspace (G Suite)
👉 Setting up DKIM in Microsoft Outlook 365
👉 Adding DKIM TXT in DNS Record To GoDaddy
👉 Adding DKIM TXT in DNS Record To Cloudflare
👉 Configuring DKIM signature in Google Workspace (G Suite)
👉 Configuring DKIM signature in Microsoft Outlook 365
Setting Up DKIM in Google Workspace (G Suite)
Initial Steps to Consider
- Ensure you have access : Only users with super administrator privileges in Google Workspace can set up DKIM settings.
- Understanding the automated DKIM key generation process : For domains managed through Google Domains Google Workspace automatically inserts a DKIM key into the DNS records. However for domains hosted elsewhere manual configuration is necessary.
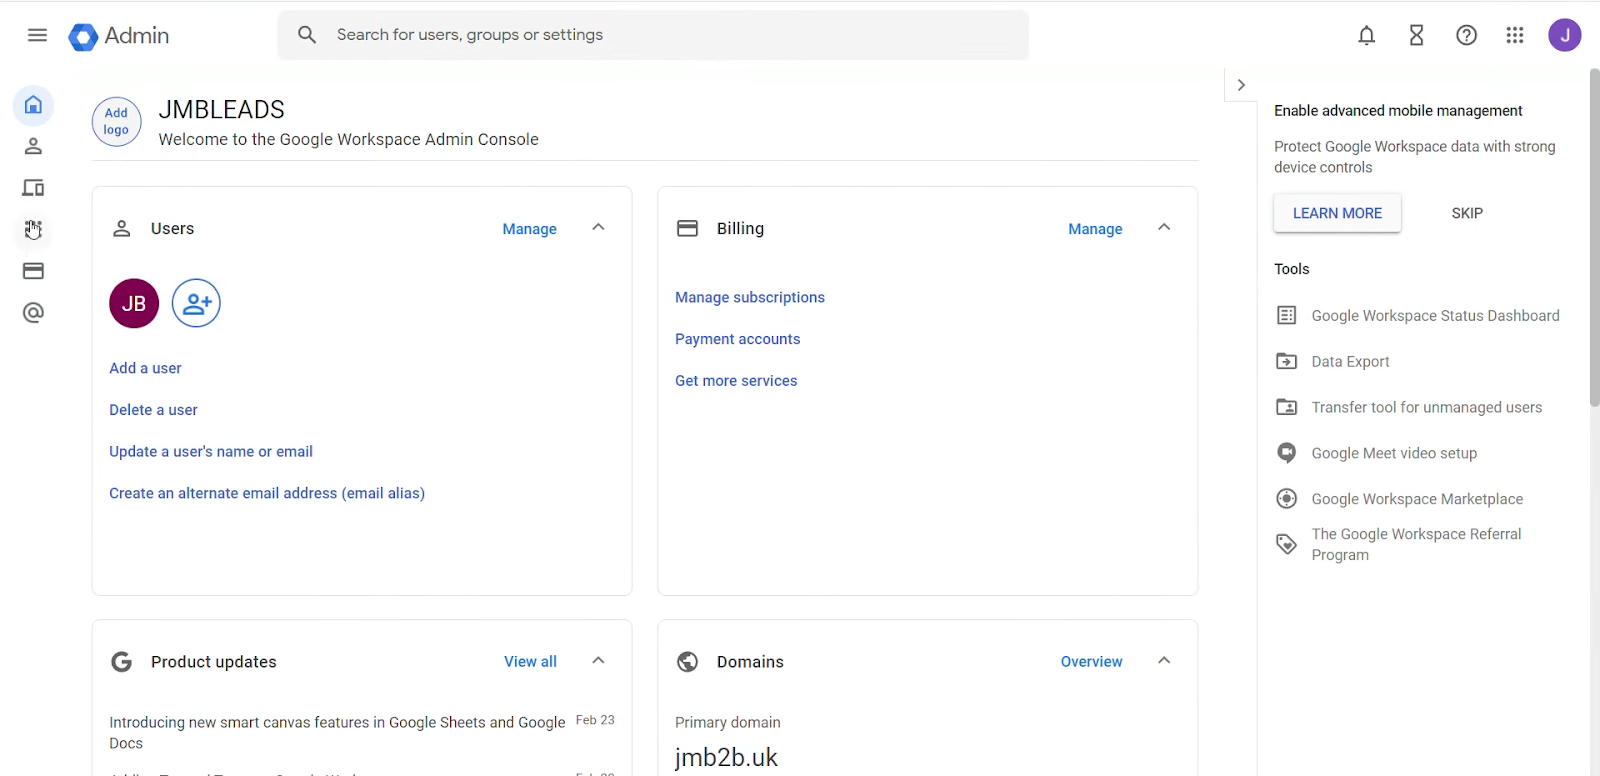
Step 1: Log in to the Google Admin Console
- Visit the Google Admin console at admin.google.com and log in using your admin credentials.
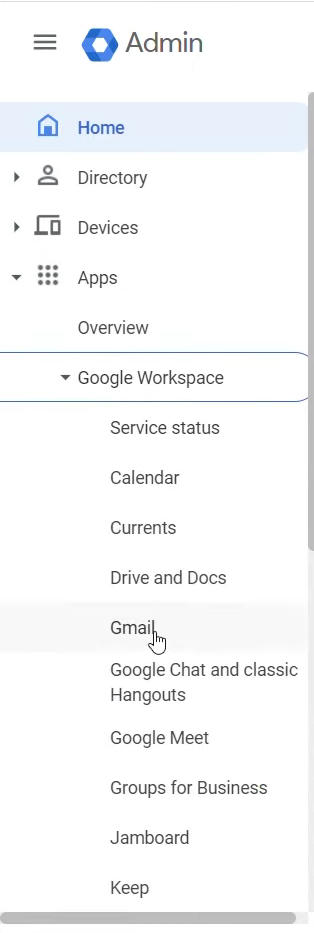
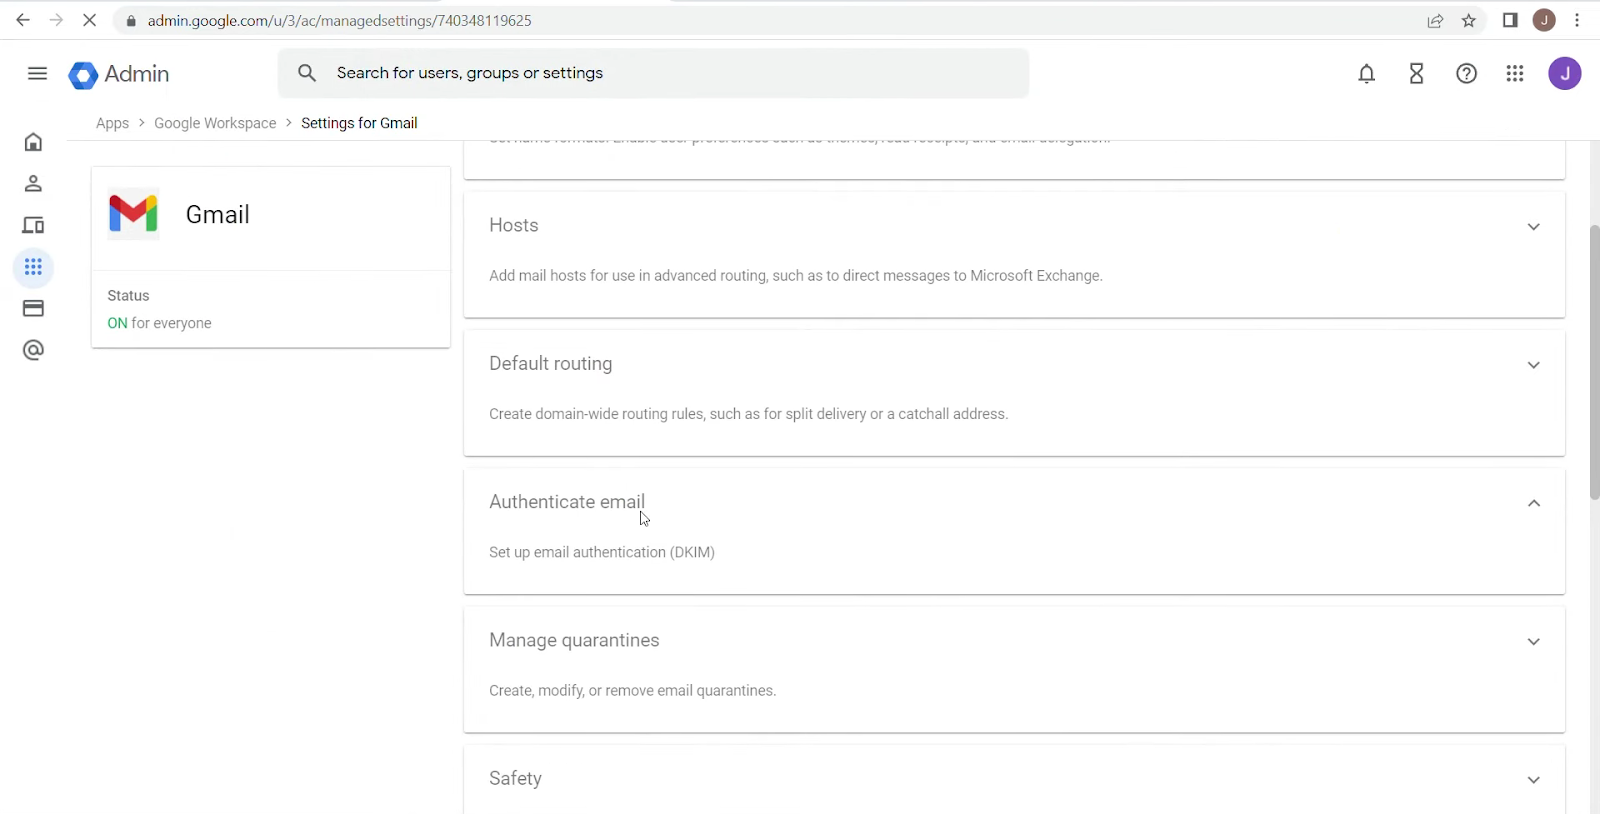
Step 2 : Access Gmail Settings
- After logging in go to Apps > Google Workspace > Gmail

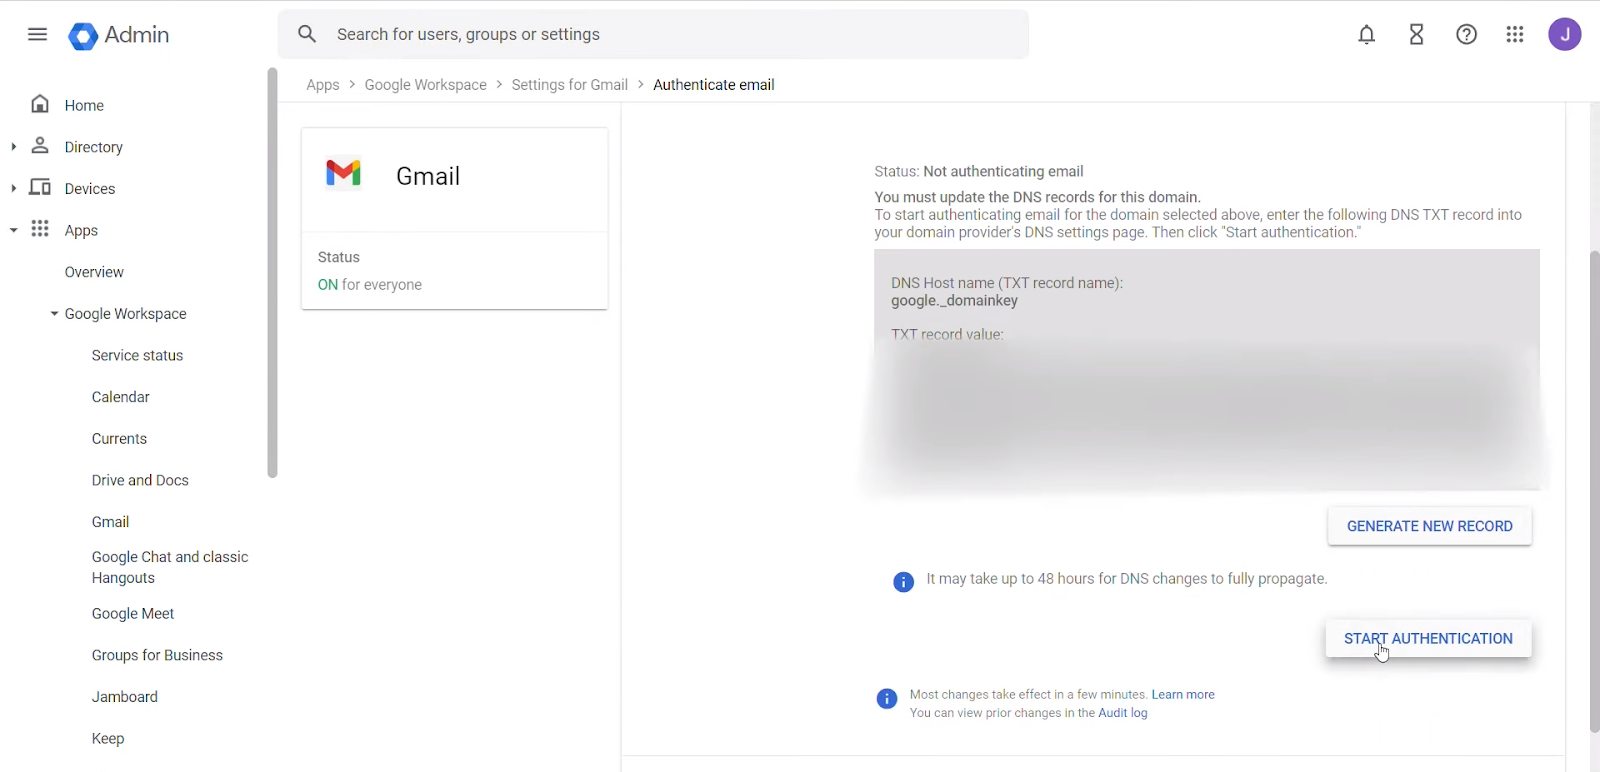
Step 3 : Locate the “Authenticate Email” Option
- Within the Gmail settings find the section labeled ” Authenticate email ” or a similar option related to email authentication.
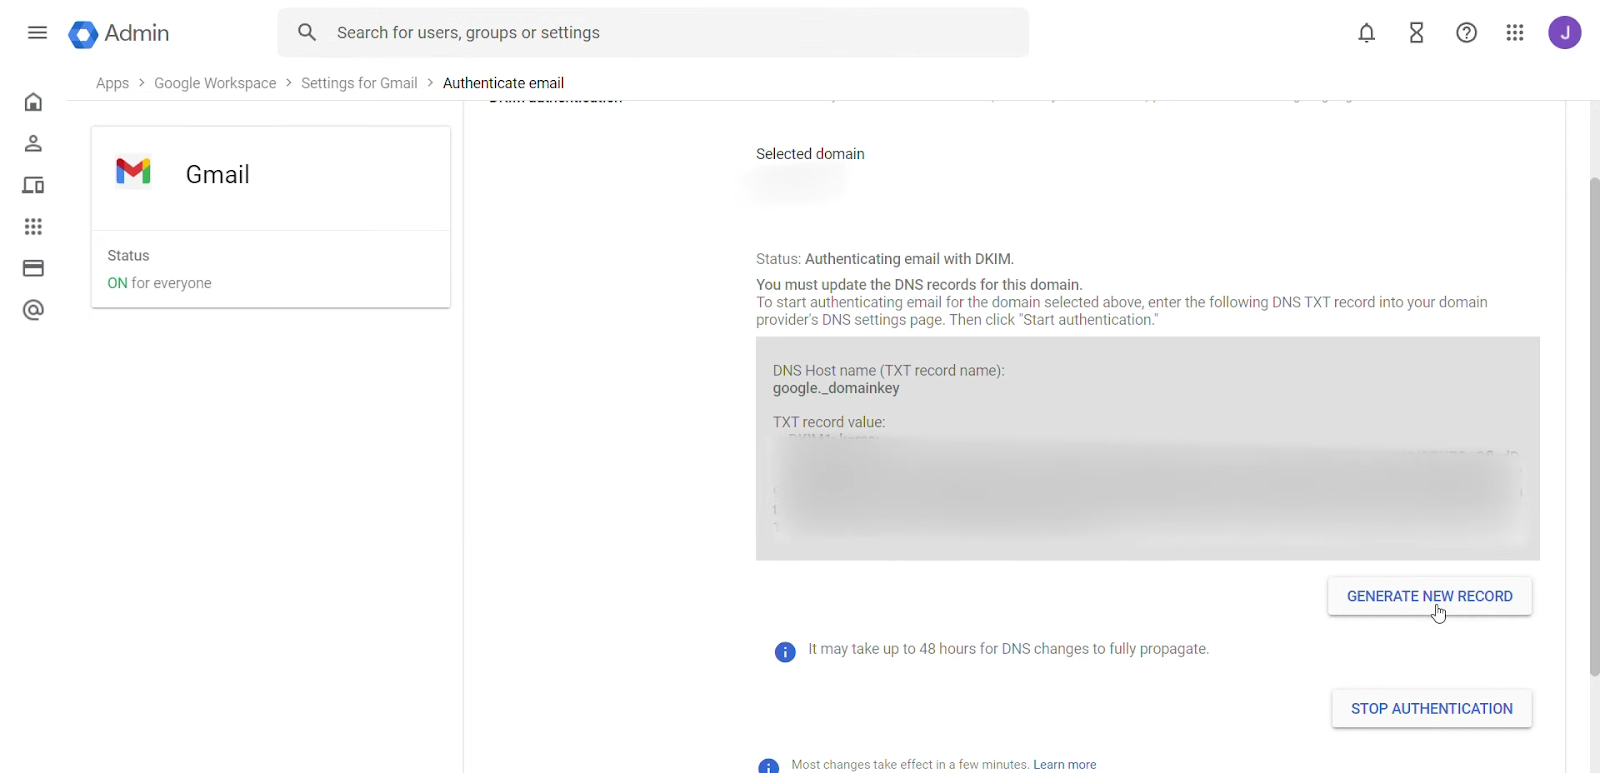
Step 4 : Create the DKIM Key
- In the “email” section select “Generate new record.”
- You will typically have a choice between lengths (1024 or 2048 bits, it’s recommended to use 2048 bits, for enhanced security).
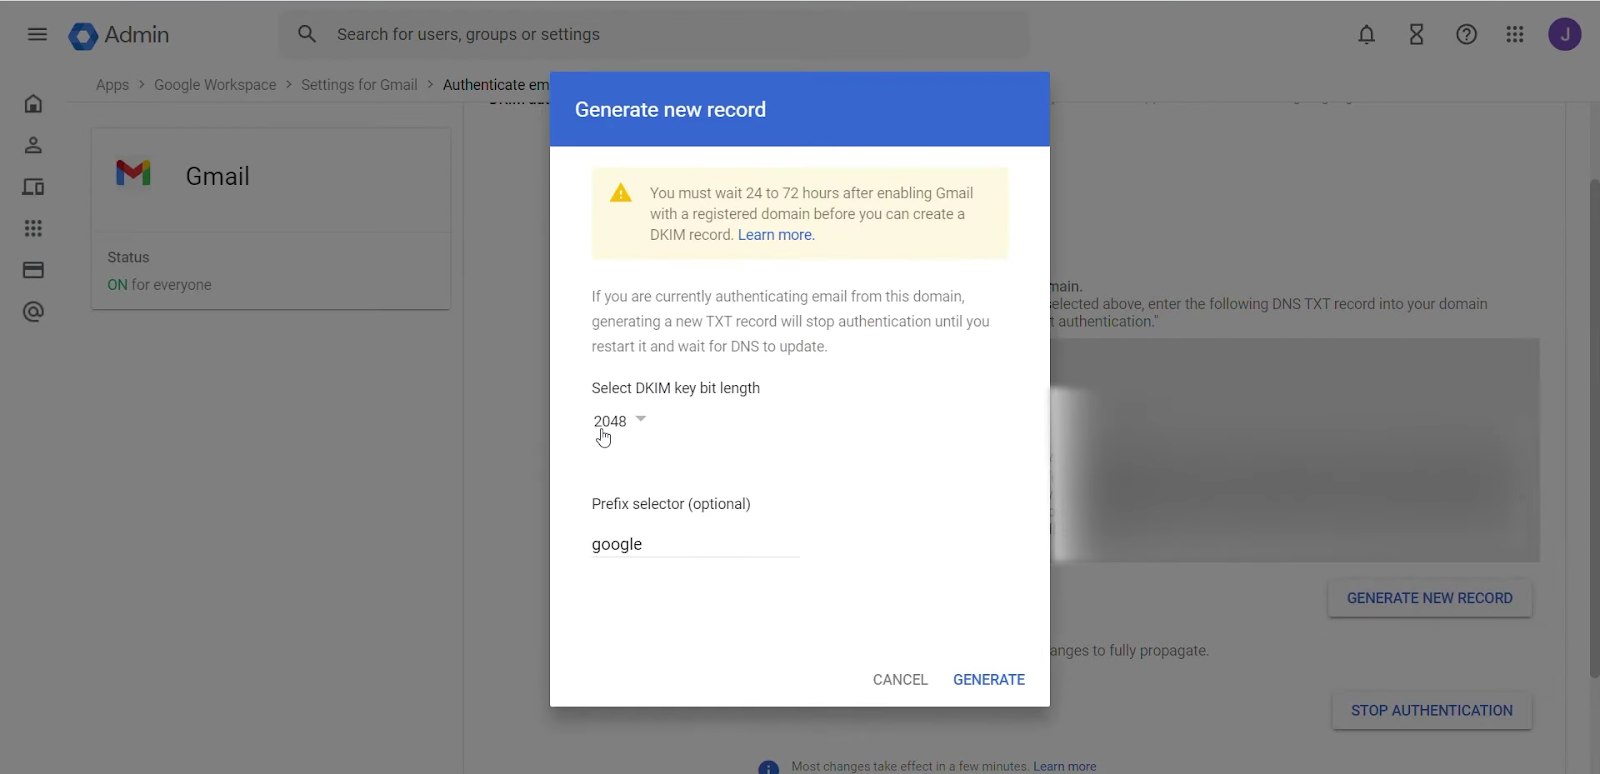
- You’ll be asked for a domain and a prefix (selector). The default selector is often fine unless you have specific needs.
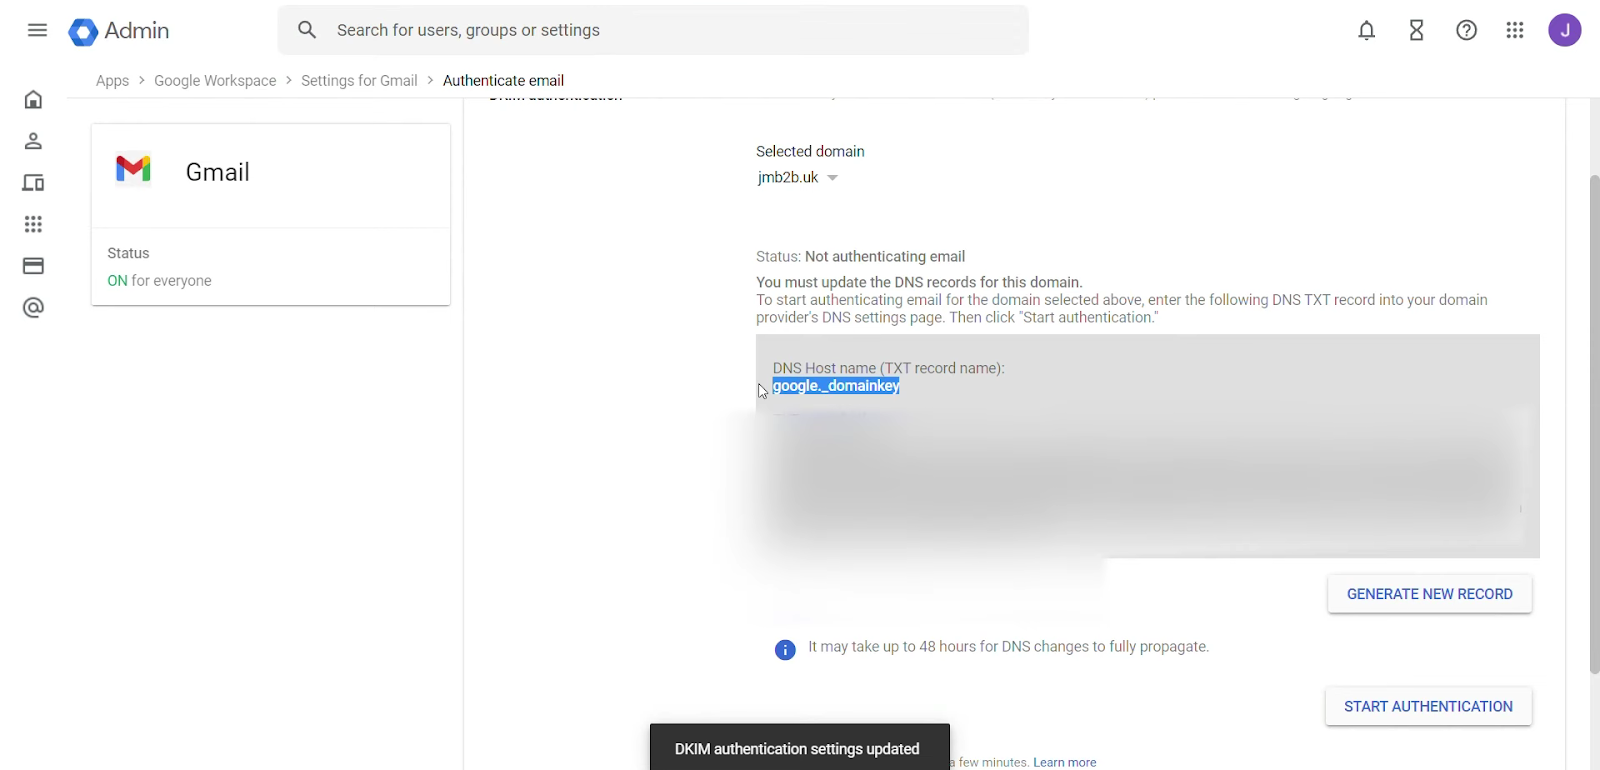
- After generating the key, Google will provide you with a TXT record. This record needs to be added to your domain’s DNS settings.
Setting Up DKIM in Microsoft Outlook 365
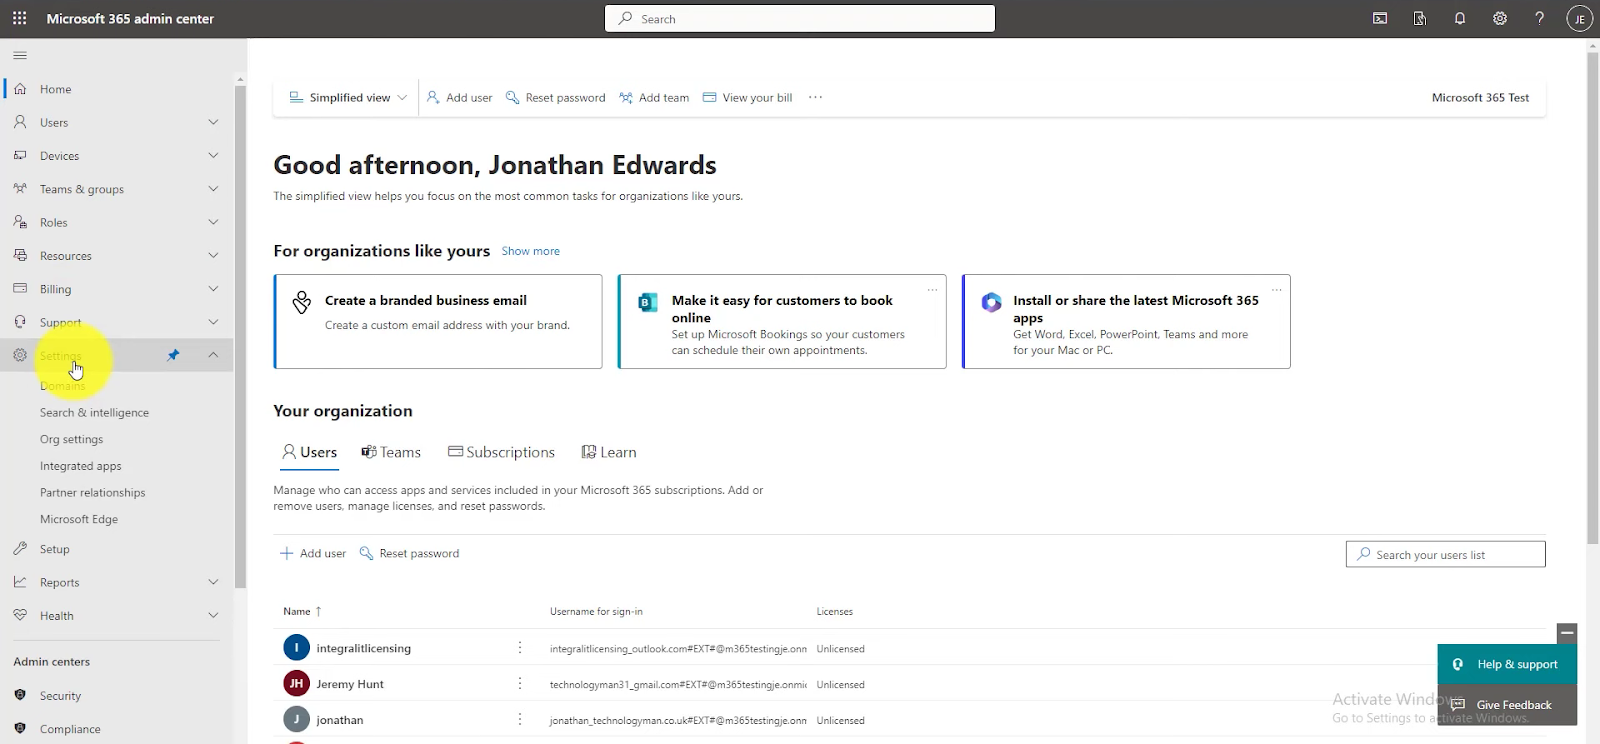
Step 1: Access the Microsoft 365 Admin Center
- Log in to the Microsoft 365 Admin Center using your credentials.
- Make sure you have the permissions to modify your organization’s email settings.
Step 2: Navigate to the Exchange Admin Center (EAC)
- Look for the “Admin centers” section on the left hand side of the navigation pane.
- Click on “settings.’’

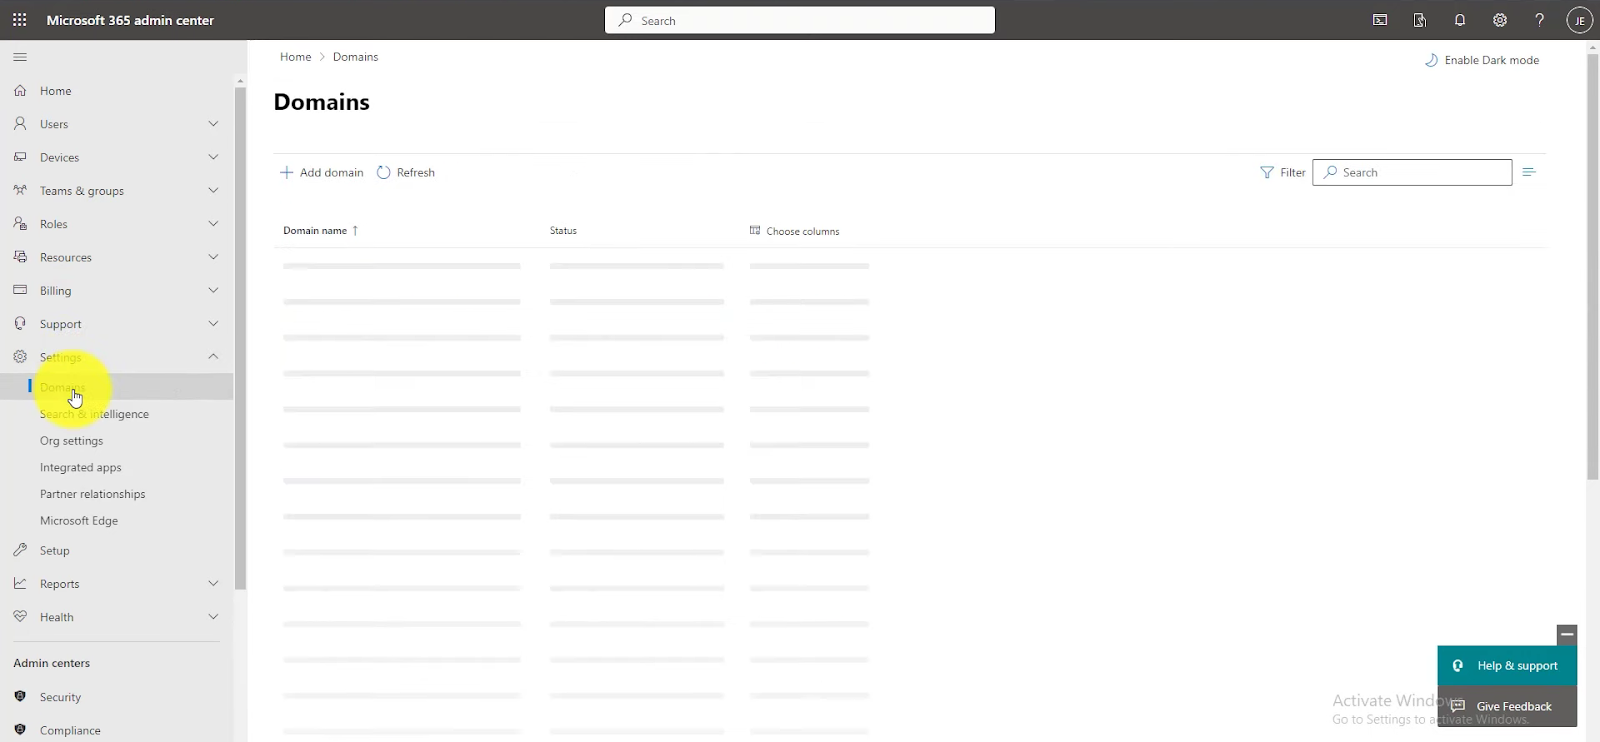
Step 3: Access DKIM Settings
- Click on “Domains” under settings.
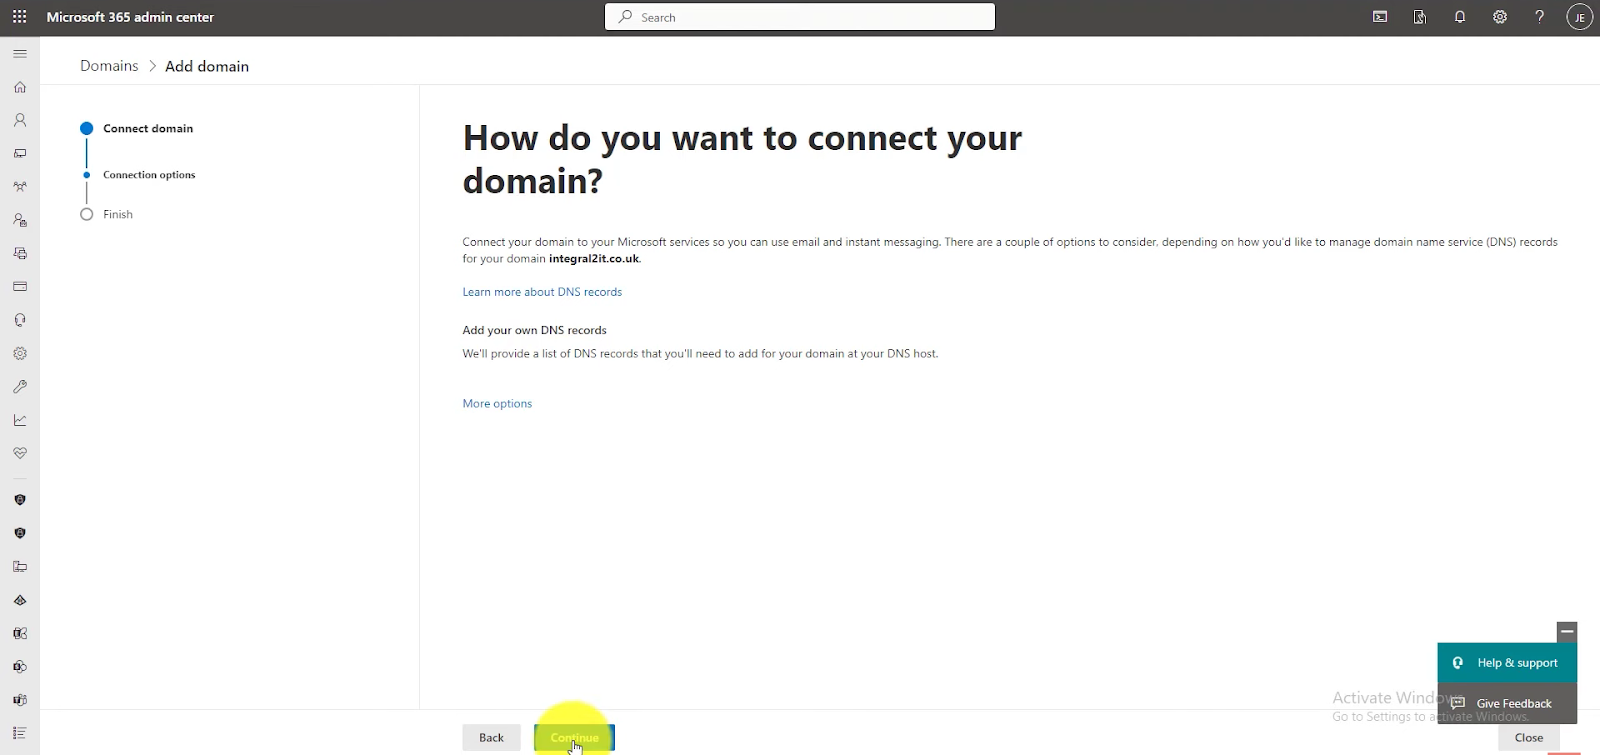
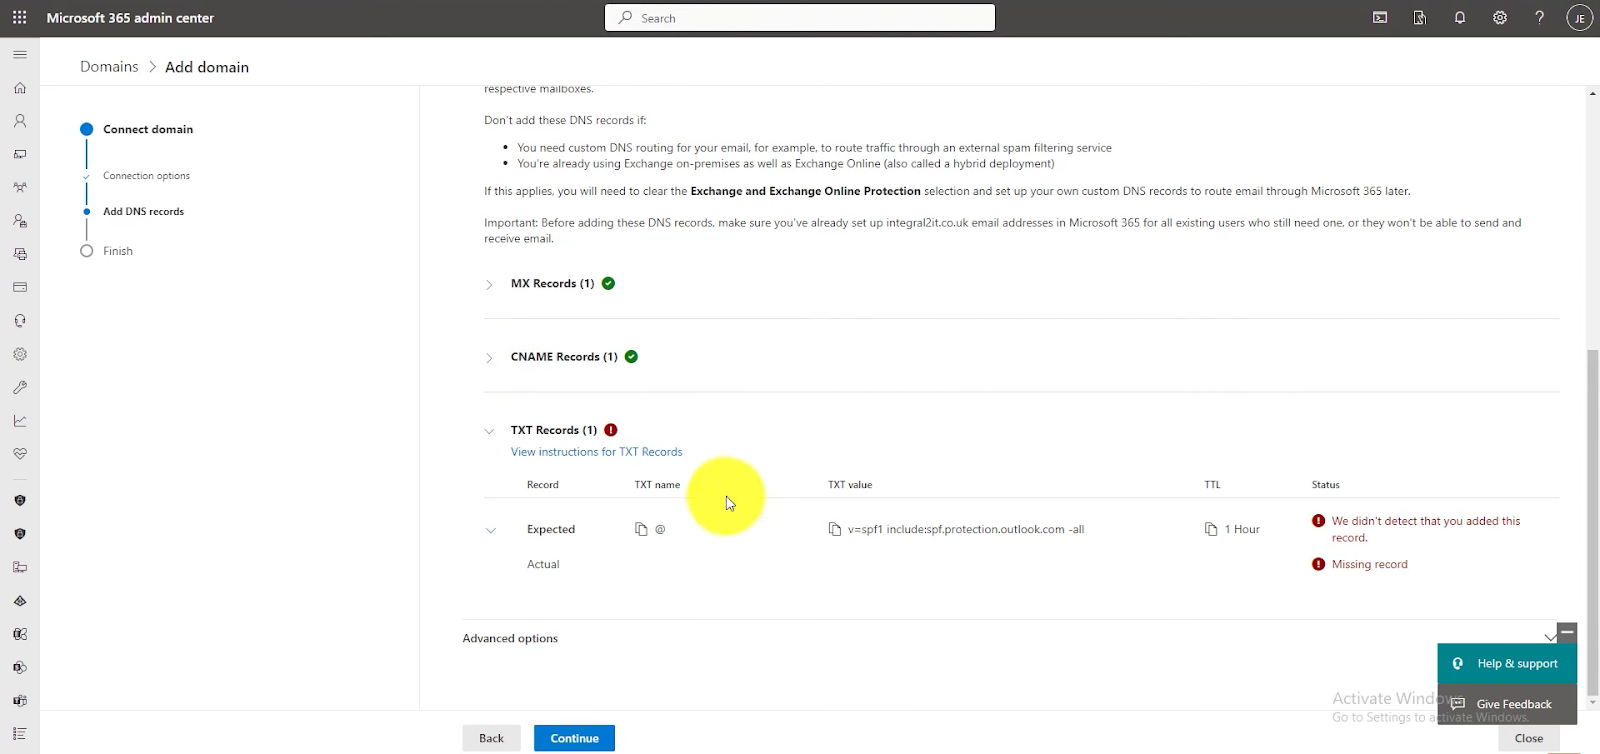
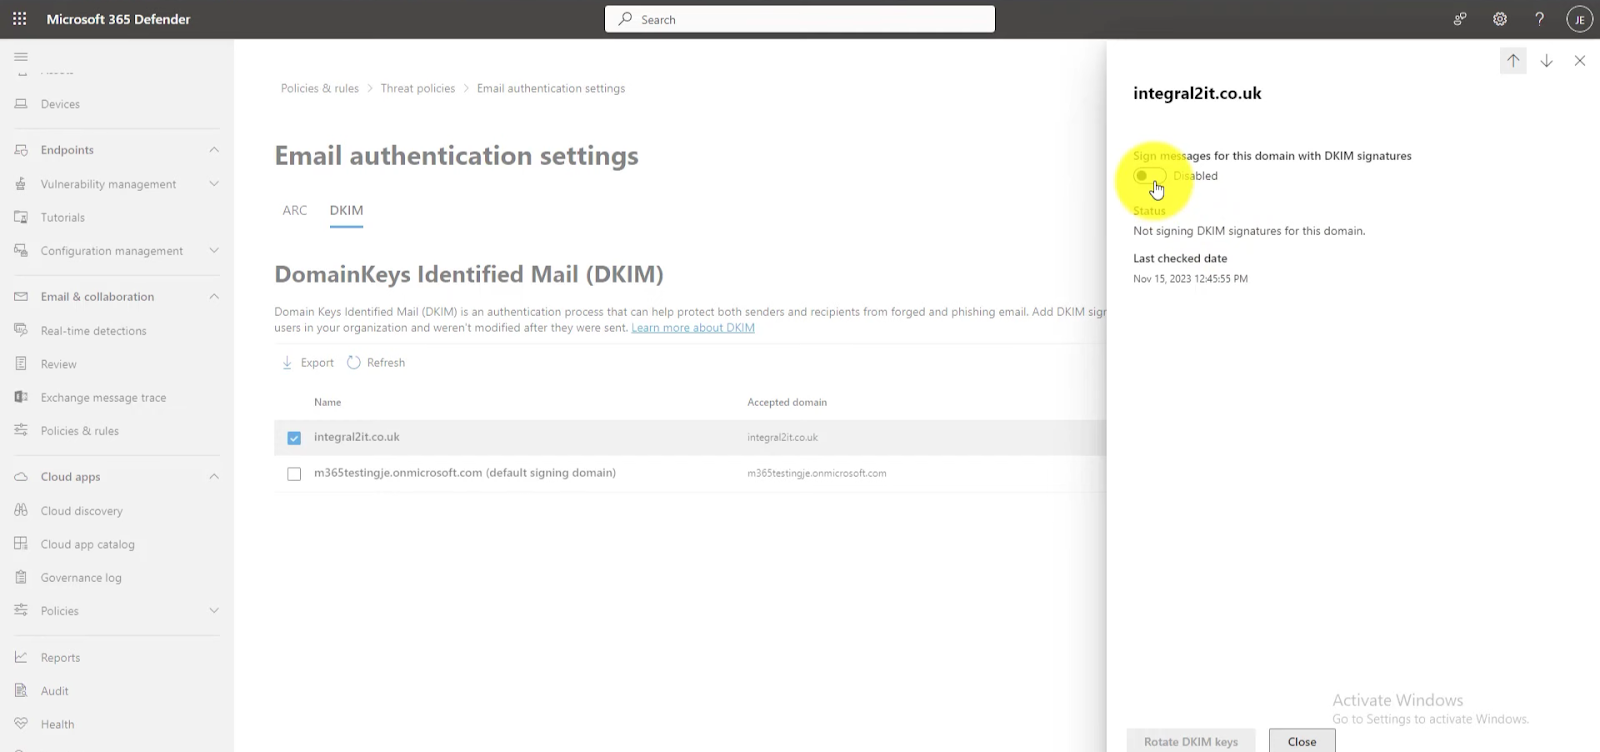
Step 4: Enable DKIM Signing
- Identify Domains : Locate your domains from a list. Choose which ones you want to enable DKIM signing for.

- Activate DKIM : Enable DKIM for each selected domain. If there are no existing DKIM DNS records follow Microsoft’s guidelines on how to add them.
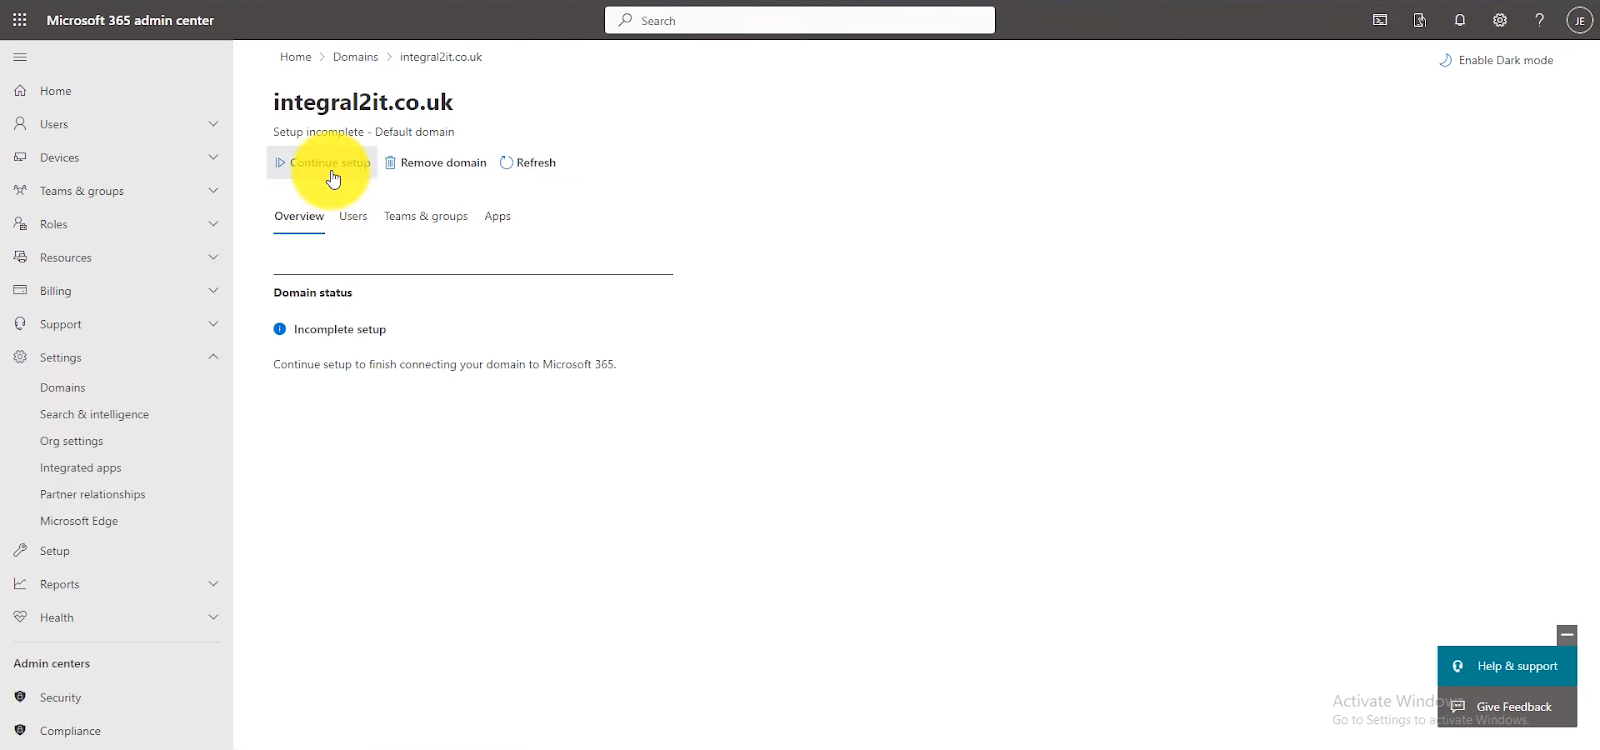
- Retrieve TXT Records : Take note of the names (hosts) and values provided by Microsoft 365 as TXT records, for each domain.
| Note : When using Google Workspace with a Google Domain or Outlook Workspace with an Outlook 365 domain, DKIM keys are automatically included in DNS records, simplifying email security without the need for manual intervention. |
Adding DKIM TXT to DNS Record in GoDaddy
Step 1 : Sign In to Your GoDaddy Account
- Once you’ve generated the DKIM record, log in to your GoDaddy account using your credentials.

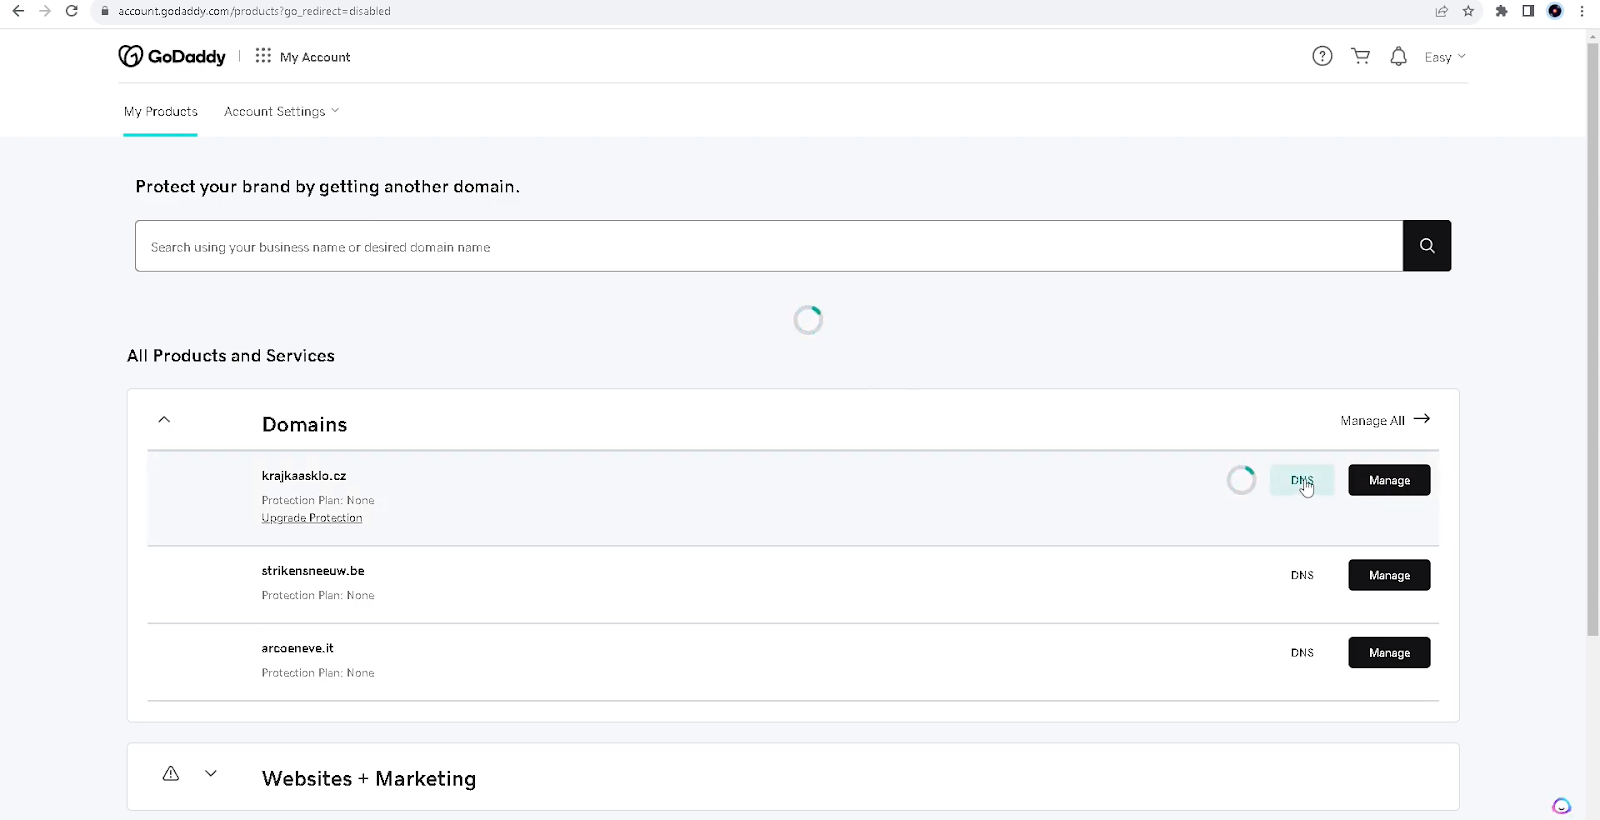
- Navigate to your product list. Directly access your domain list if you’re familiar with GoDaddy’s dashboard.

Step 2 : Navigate to Your Domain’s DNS Settings
- Locate the domain where you want to add the DKIM record and click on it.
- Look for an option like “DNS ” “Manage DNS,” or “DNS Settings”. Click on it. This will lead you to the DNS Management page.
Step 3 : Get Ready to Add a New Record
- On the DNS Management page you’ll find a list of DNS records.
- Towards the top or bottom of this list search for a button labeled “Add” or “Add Record.”
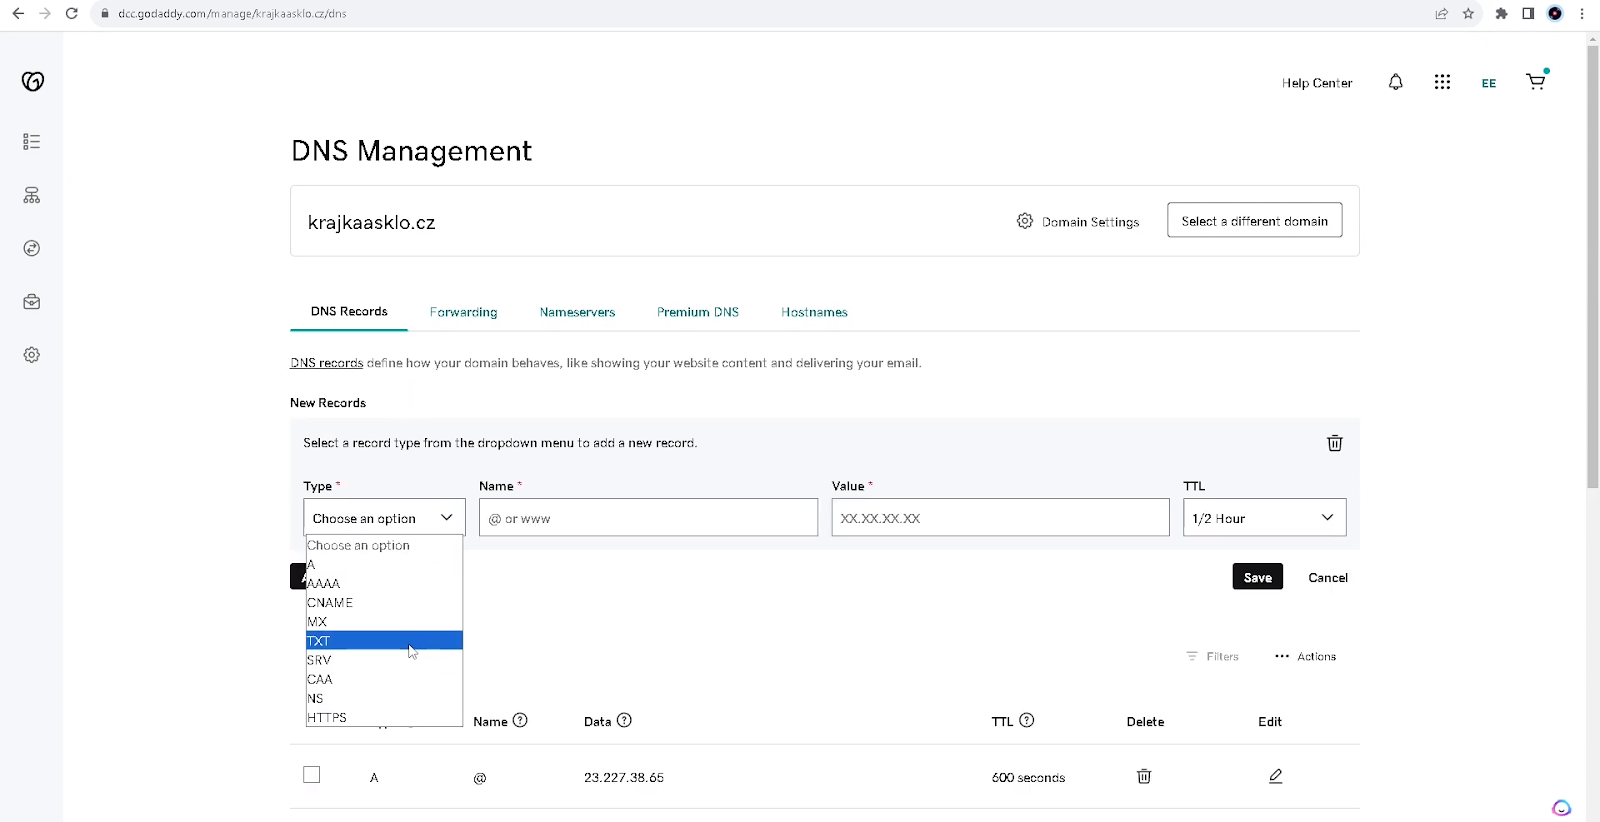
Step 4 : Select the Record Type
- Click the “Add New Record” button to open a form for inserting a DNS record.

- From the menu pick “TXT” as the record type. Remember, DKIM records are always added as records.
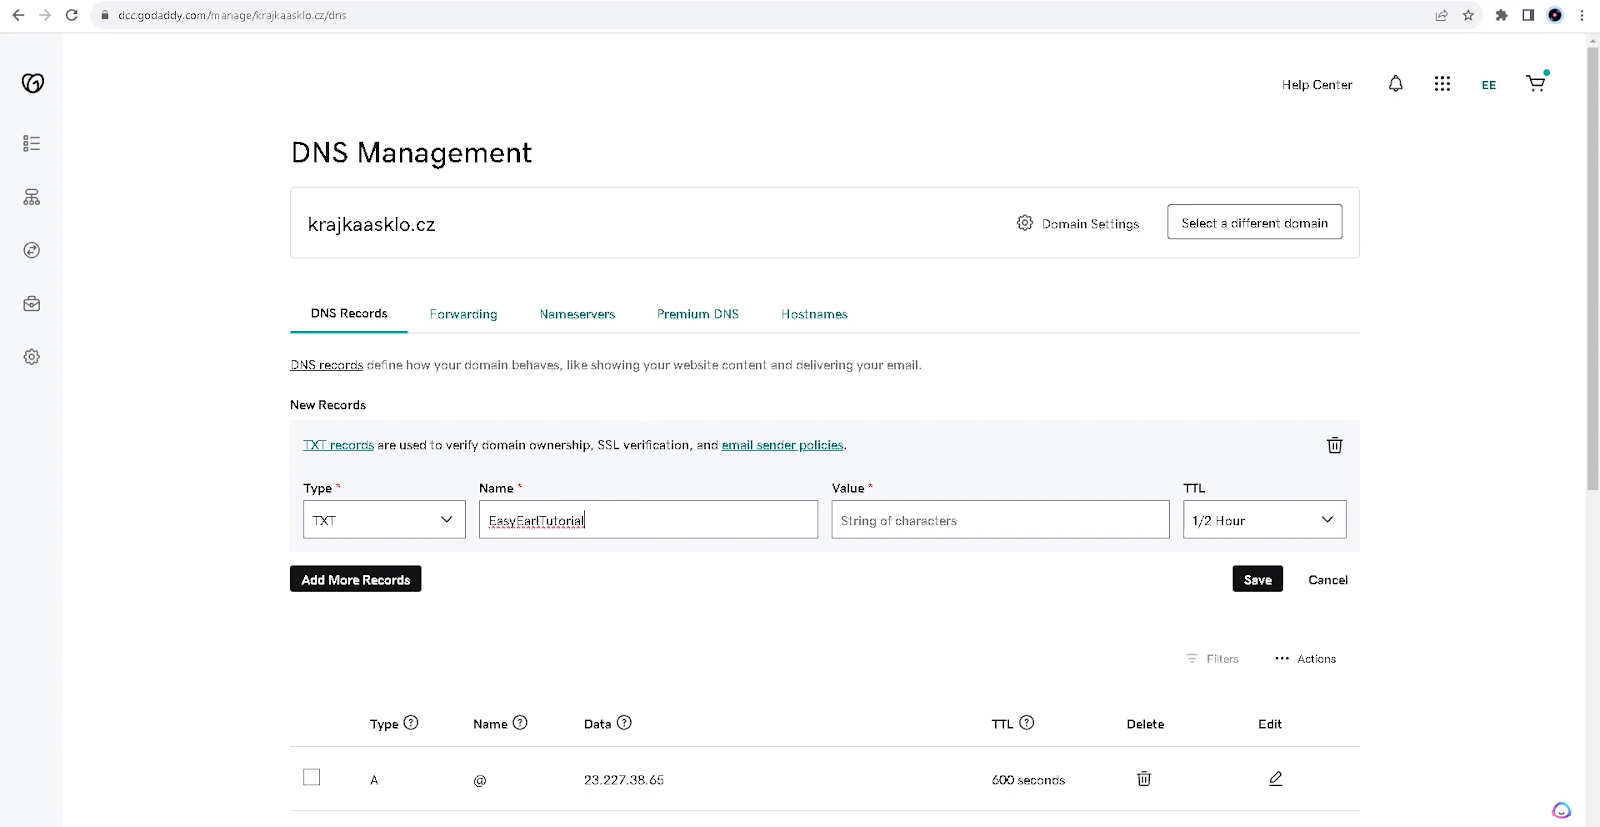
Step 5. Enter the DKIM Record Details:
Within the form complete the fields with your DKIM record details,
- Name : Enter the host name provided by your email service, such as s1._domainkey or google._domainkey, depending on the selector provided.
- TXT Value : Paste the entire DKIM string provided by your email service provider, starting with “v=DKIM1,” and followed by a series of characters.
- TTL (Time to Live) :The TTL sets how long servers cache the record. Use GoDaddy’s default value, 1 hour (3600 seconds) if you’re unsure.

Step 6. Save the New Record:
- Once you’ve entered all DKIM details, locate and click on a “Save” button to store the TXT record.
- It might take some time for the new record to propagate across the Internet, so don’t worry if you don’t see the changes immediately.
| Note : Please note that DNS updates may require up to 48 hours to spread on the Internet so it’s common for a delay to occur before your DKIM record is fully verified. |
Adding DKIM TXT to DNS Record in Cloudflare
1. Log into Cloudflare
- Access Account : Go to the Cloudflare website. Log in using your account details.
- Select Your Domain : Once logged in select the domain you want to set up for DKIM verification.
2. Navigate to DNS Management
- DNS Section : In your domain’s dashboard, locate and click on the “DNS” tab to manage your DNS configurations.

3. Adding the DKIM TXT Record
- Start Record Addition : Click on “Add record” to begin adding a DNS entry.

- Record Type : Select “TXT” from the dropdown menu for the type of record you’re adding.
- Name/Host Field : In the “Name” field, enter your DKIM selector followed by ._domainkey. For instance, if your selector is s1, and your domain is example.com, you would enter s1._domainkey.example.com.
- Content/Value Field : Paste the DKIM record value obtained from your ESP into the “Content” field. It’s a long string that starts with “v=DKIM1,” and includes your public DKIM key.
- TTL Setting : You can just leave the Time To Live (TTL) as “Auto.” Choose a specific TTL based on how frequently you plan to update the record.
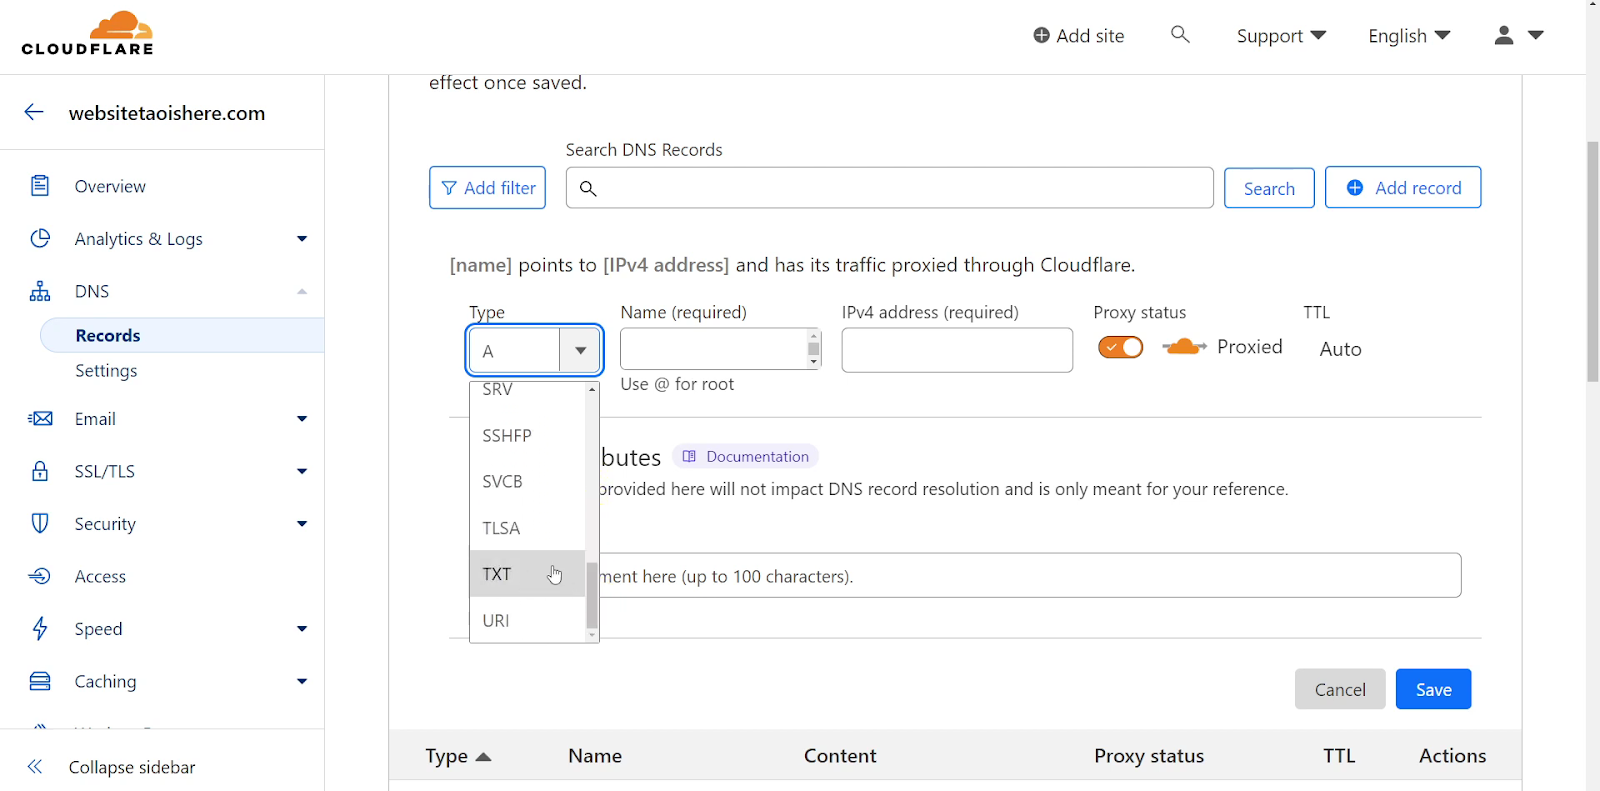
4. Save the Record
- Save the Record : Once you have filled in all the information click on “Save” to insert the DKIM TXT record to your domain’s DNS settings.
- Propagation : DNS changes might not reflect immediately. It can take anywhere from a few minutes to 48 hours for the new DKIM record to propagate across the internet.
| Note : Usually, DKIM uses TXT records in DNS. For external email services, CNAME records may be used to link to their DKIM records for easier management. |
| Cloudflare’s proxy routes website traffic through its network for enhanced security, faster loading times, and hidden server IPs. |
Configuring DKIM signature in Google Workspace (G Suite)
Step 1: Verify DKIM Setup
- After adding the DKIM TXT record to your DNS settings go back to the Google Admin console.
- Return to the “Authenticate Email” section or wherever you started generating the DKIM key.
- Look for an option to verify or check the DKIM setup.
- Google may provide a verification method or tool to confirm that the DKIM record has been correctly published and configured.
Step 2: Test DKIM Configuration
- Send a test email from your domain to an external email address.
- Request the recipient to inspect the email headers to verify that the DKIM signature is included and set up correctly.
- The DKIM signature should indicate that the email has been signed by your domain’s DKIM key.
Configuring DKIM Signature in Microsoft Outlook 365
Step 1: Confirm DKIM Setup
- Once you have added the DKIM TXT records to your domain’s DNS settings go back to the Exchange Admin Center (EAC).
- Navigate back to the DKIM settings section.
- Look for an option to confirm or activate the DKIM setup.
| Tip : You can also use online DKIM record checker tool MXToolbox to verify if the DKIM records are correctly published and configured. |
Step 2: Test DKIM Configuration
- Send a test email from your domain to an external email address.
- Ask the recipient to review the email headers to confirm that the DKIM signature is present and correctly configured.
- The DKIM signature should indicate that the email has been signed by your domain’s DKIM key.
Maintenance of DKIM: Key Rotation and Monitoring
Maintaining the security and effectiveness of DomainKeys Identified Mail (DKIM) is vital for organizations to protect the integrity of their email communications. This requires two central practices: Key Rotation and Monitoring.
Key Rotation
Key rotation means regularly changing the public and private keys used to create DKIM signatures. This is crucial for several reasons,
- Enhanced Security: The longer a key is active, the more likely it could get compromised over time through different methods. Rotating keys proactively reduces the risk of key compromise.
- Compliance: Some sectors have rules needing periodic key refreshes to uphold stringent security standards.
- Reputation Upholding: New keys display an ongoing commitment to email security, as stakeholders can see you’re actively managing it.
Executing Key Rotation:
- Generate New Keys: Create new DKIM public and private key pairs. Various DNS tools or command-line utilities can assist with this.
- Update DNS Entry: Switch the old public key in your DNS TXT record with the newly generated one. This allows recipients to verify the signature made by the new private key.
- Reconfigure Mail Servers: Update your email servers to utilize the new private key for signing outgoing emails.
- Test: After updating, send test emails to confirm the DKIM signature is valid with the new keys.
- Schedule Regular Rotations: Depending on your needs and communication sensitivity, plan key rotations at standard intervals, like every 6-12 months.
Monitoring
Supervising the performance of your DKIM configuration ensures it functions as intended, enhancing both email deliverability and security.
Effective monitoring can detect,
- Configuration Errors: Mistakes in DKIM records or server settings that could cause email authentication failures.
- Delivery Problems: Issues that may result in emails being rejected or marked as spam by recipient servers.
- Spoofing Attempts: Abnormal activity that could signify attempts to spoof your domain, despite DKIM protection.
DKIM Monitoring Methods
- Use Validation Tools: DKIM validators or DNS checkers can validate if your DKIM records are correctly posted and visible.
- Review Email Headers: Regularly inspect headers of emails from your domain to confirm valid DKIM signatures are present.
- Track Deliverability: Utilize email service provider analytics to monitor deliverability rates. A sudden decrease may signify DKIM or other email authentication problems.
- Configure Alerts: Some monitoring tools have alerts for DKIM signature failures or DNS record changes that could impact DKIM.
FAQs
👉 How often should DKIM keys be rotated?
Regularly updating DKIM keys can improve security. Although there isn’t a timeframe it’s suggested to review and modify your rotation schedule according to the scale of your company and the amount of emails sent.
👉 Can DKIM alone guarantee email deliverability?
While DKIM does increase the chances of your emails reaching their intended destinations by confirming their authenticity it’s not a method for ensuring deliverability by itself. It works best when combined with SPF and DMARC protocols.
👉 What happens if the DKIM setup is incorrect?
Incorrect setup of DKIM can result in your emails being marked as spam or rejected by the receiving servers. It’s essential to have settings and regular checks to maintain the efficacy of your email authentication strategy.
👉 Can I use DKIM without SPF?
Certainly DKIM can function independently from SPF but employing both offers defense against email spoofing attempts.
👉 What is the difference between DKIM and DMARC?
DKIM validates the sender of an email through means whereas DMARC extends this by incorporating aspects of both DKIM and SPF to provide guidelines on managing unauthenticated emails.
👉 Can I have multiple DKIM records?
Yes you have the option to establish DKIM records for various sources that send emails from multiple domains or different email services.
👉 What is the structure of DKIM records?
A DKIM record is essentially an entry within DNS that follows specific formatting rules containing custom domain selectors, public keys and additional tags outlining key parameters and policies.
Comprehensive Defense Mechanism
Implementing DKIM is a crucial step for any organization to authenticate outbound emails, confirm sender identity, and safeguard message integrity. By adding valid cryptographic signatures, DKIM prevents spoofing attempts, reducing spam and enhancing deliverability rates.
While Google Workspace, Microsoft 365, and other leading email platforms may automatically configure DKIM for their own domains, using custom or external domains requires some manual DNS record additions and software configurations. This process has been covered in detail across various platforms and DNS hosts.
This maintains trust in the email system, as a secure communication tool.
Together, DKIM, SPF, and DMARC constitute a robust defense against various email-based threats by:
- Providing reliable email authentication, diminishing the likelihood of phishing or spoofed emails reaching their targets.
- Empowering domain owners with control over how failed authentication emails should be handled, enabling a proactive email security approach.
- Furnishing monitoring and reporting tools, which are integral for sustaining email integrity and responding to threats.
Image Sources
https://youtu.be/sJ-5URX19d4?si=ZbpdAixPTNlRuf5u
https://youtu.be/iSRz75xEd3c?si=C8se9OK_fzfX_C8d
https://youtu.be/_4igyPO28JQ?si=n4U2Q8sXTZgdmOSk